Introduction to digital forensics
CompTIA Security+
Managing Certificates
Exercise 5 - Managing Key Recovery
Exercise 5 - Managing Key Recovery
The previous exercise illustrated that if a user account having access to the encrypted file is deleted, it will be denied access to the folder/file it had encrypted even if the account is re-created with the exact same properties as the old user account. This exercise will demonstrate how to recover an archived certificate/key that was issued to the user and show how to link the certificate to its rightful owner. After which you will perform an export of the key to a file and finally test if the recovered key can be used for decrypting a protected document.
To learn more about managing and recovering archived keys, please consult your reference material or use your preferred search engine to research this topic in greater detail.
Task 1 - Import Key Recovery Agent certificate
In this task, you will import keys that are archived on the PLABDM01.
Recall that you have imported the file called AdminKRA.cer into PLABDM01 in an earlier exercise.
Step 1
Connect to PLABDM01.
Reopen the Console1 window that you minimized earlier.
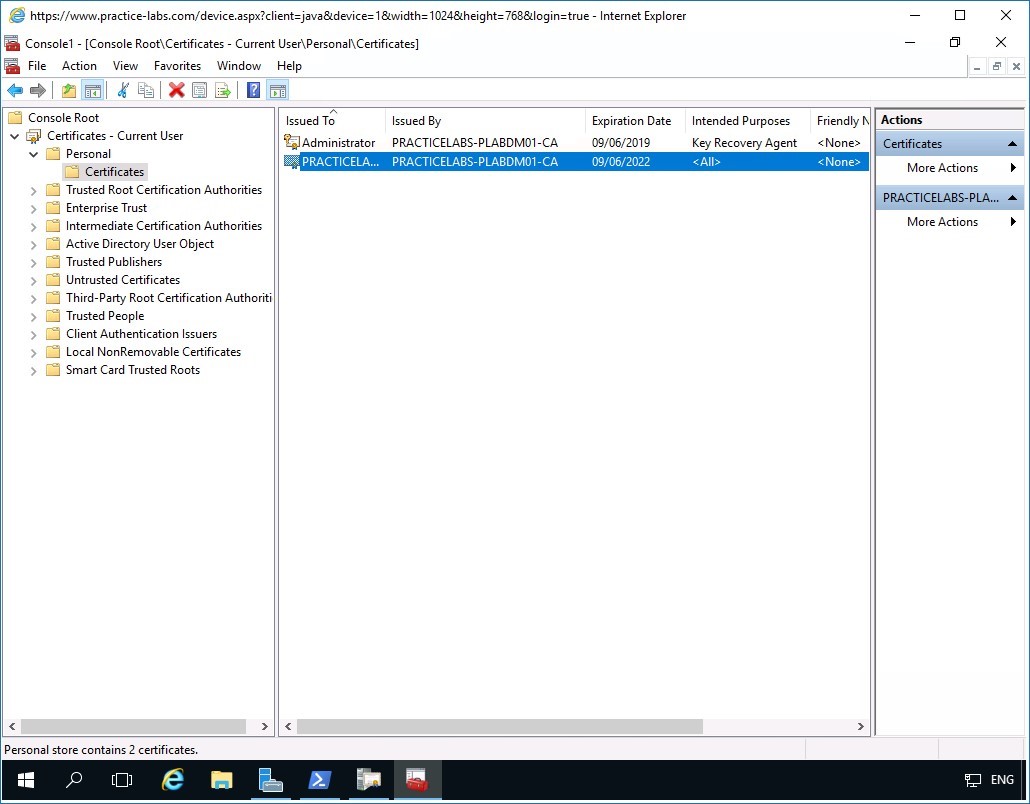
Under Certificates- Current User node, expand Personal then click Certificates folder.
Notice on the details pane at the right, the Key Recovery Agent certificate.
Important: The file you imported in this MMC is just .cer file which is not capable of decrypting the encrypted file as this is only a certificate. You will need to export this file into .pfx format that includes a certificate and key that will unlock an encrypted file.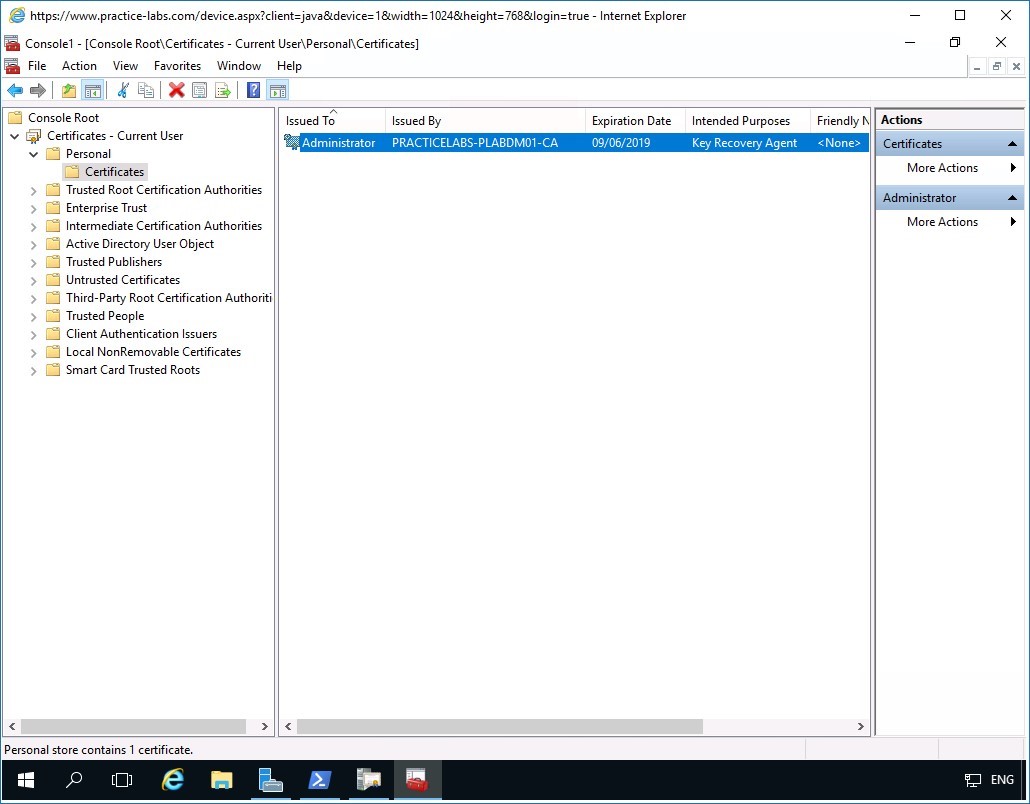
Step 2
Right-click Administrator certificate and point to All Tasks and select Export.
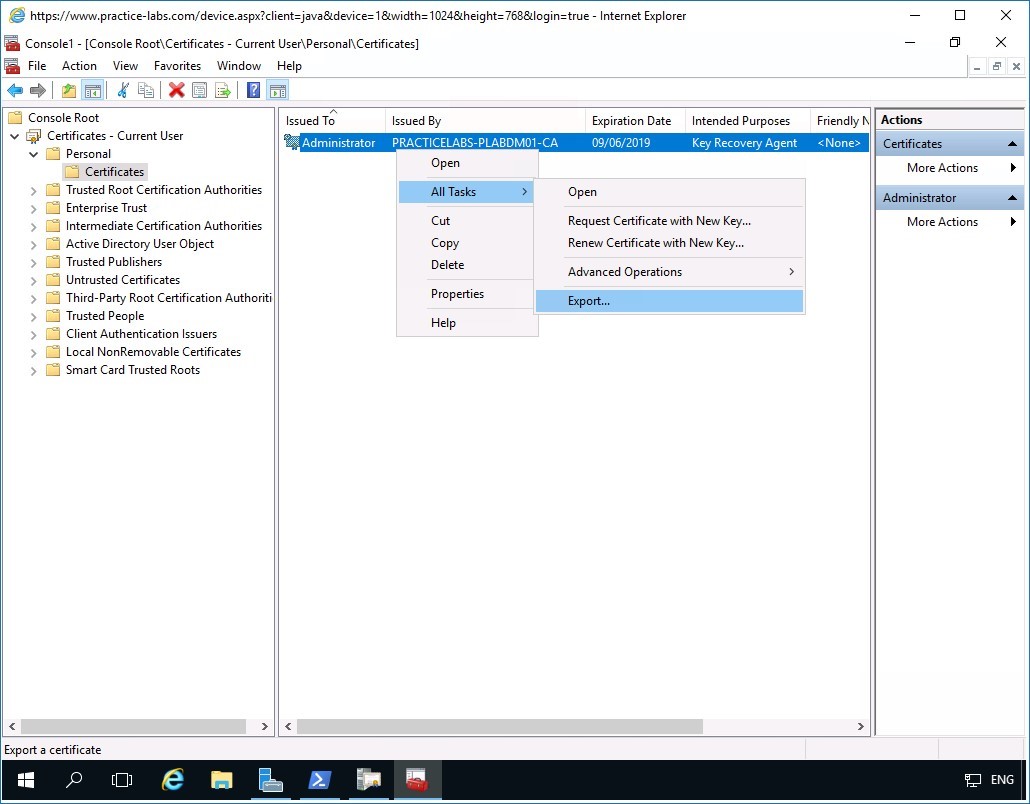
Step 3
Click Next in the Welcome to the Certificate Export Wizard page.
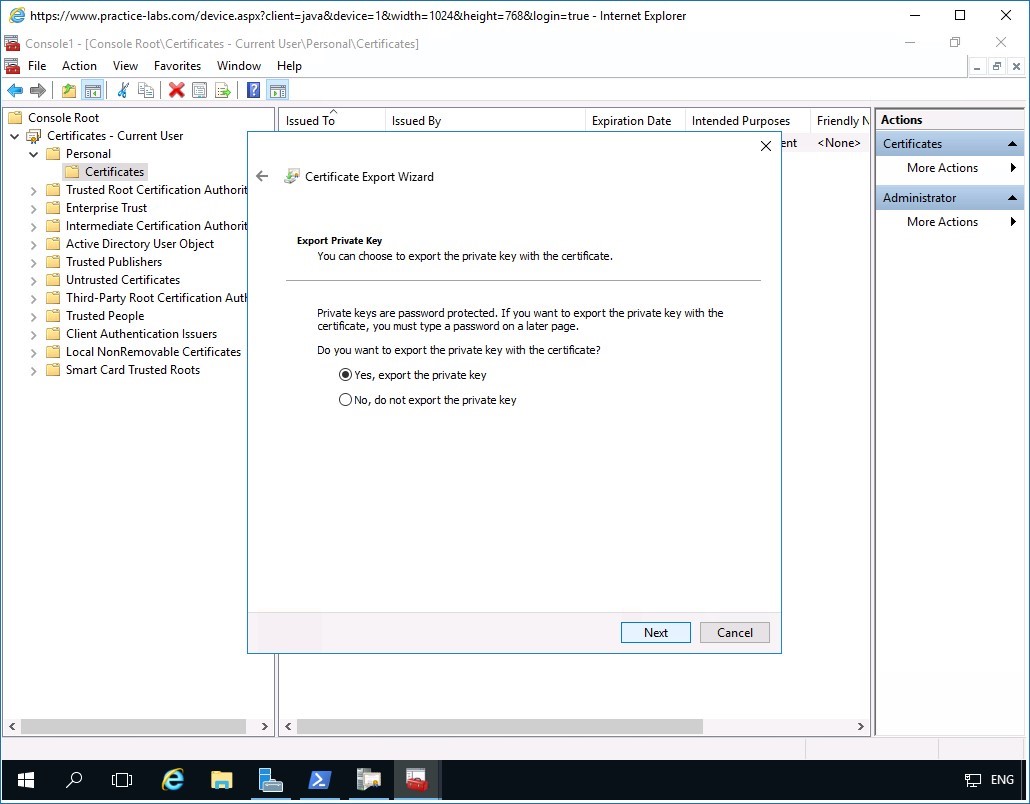
Step 4
In the Export Private Key page, select Yes, export the private key option button.
Click Next.
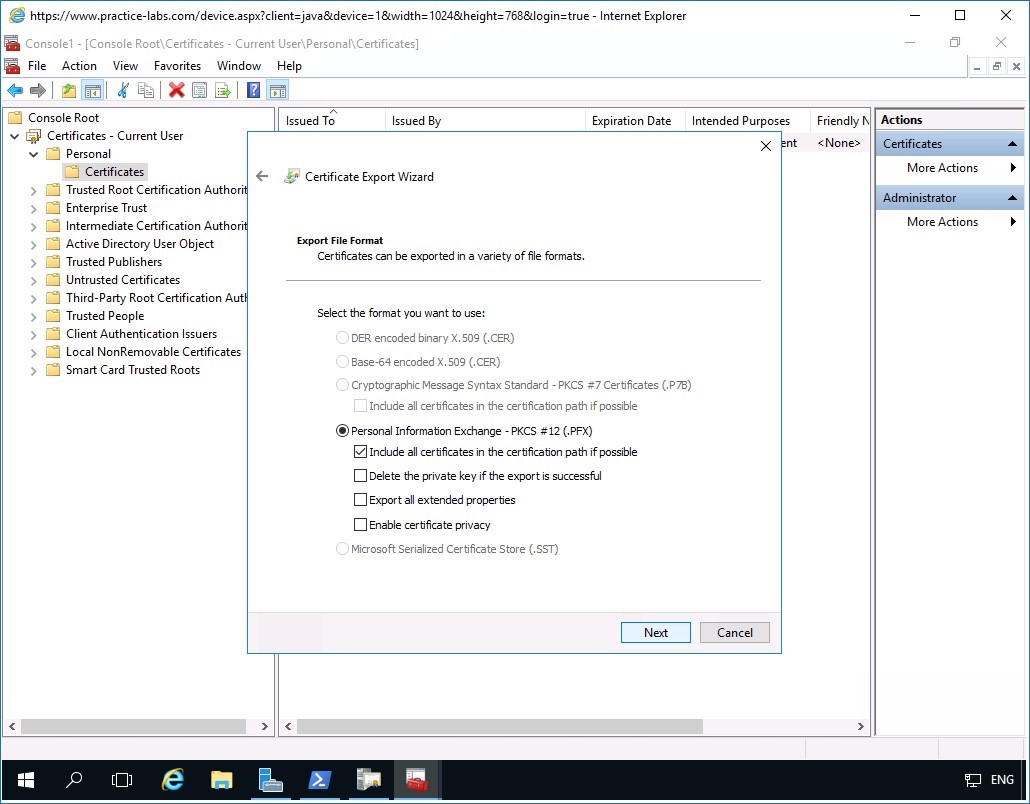
Step 5
In the Export file format page, verify that Personal Information Exchange - PKCS #12 (.PFX) option button is selected.
Verify that Include all certificates in the certification path if possible check box is selected as well.
Click Next.
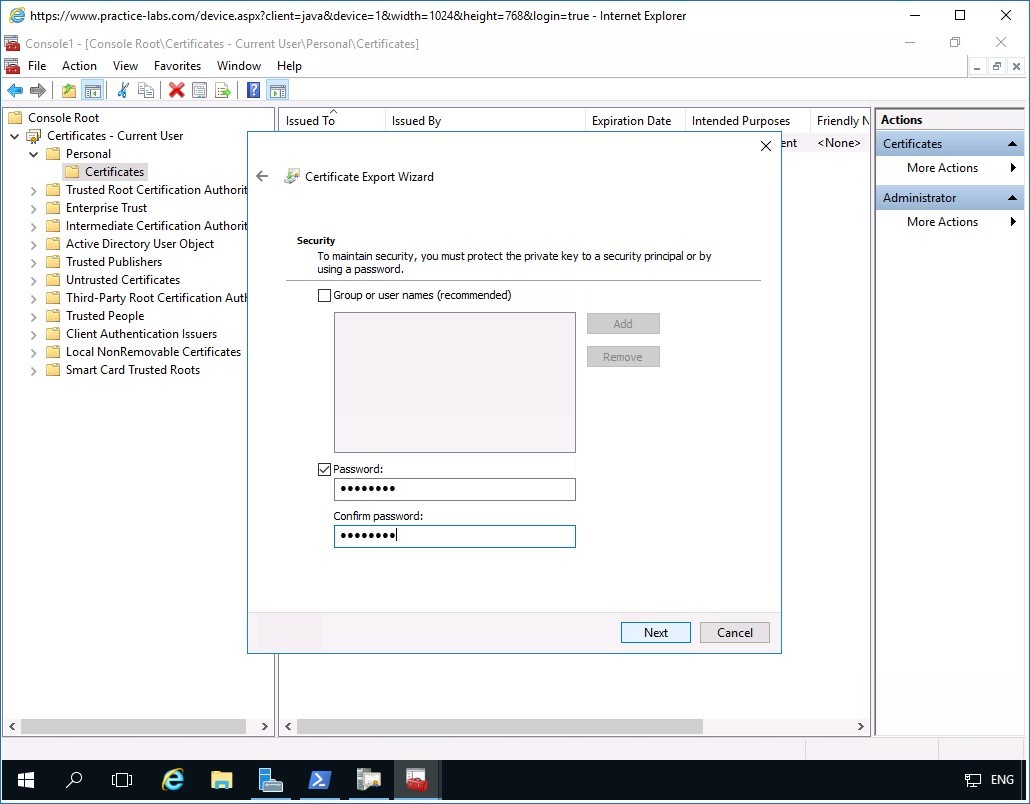
Step 6
In the Security page, select Password check box.
Click in the Password and Confirm password text boxes, type:
Passw0rdClick Next.
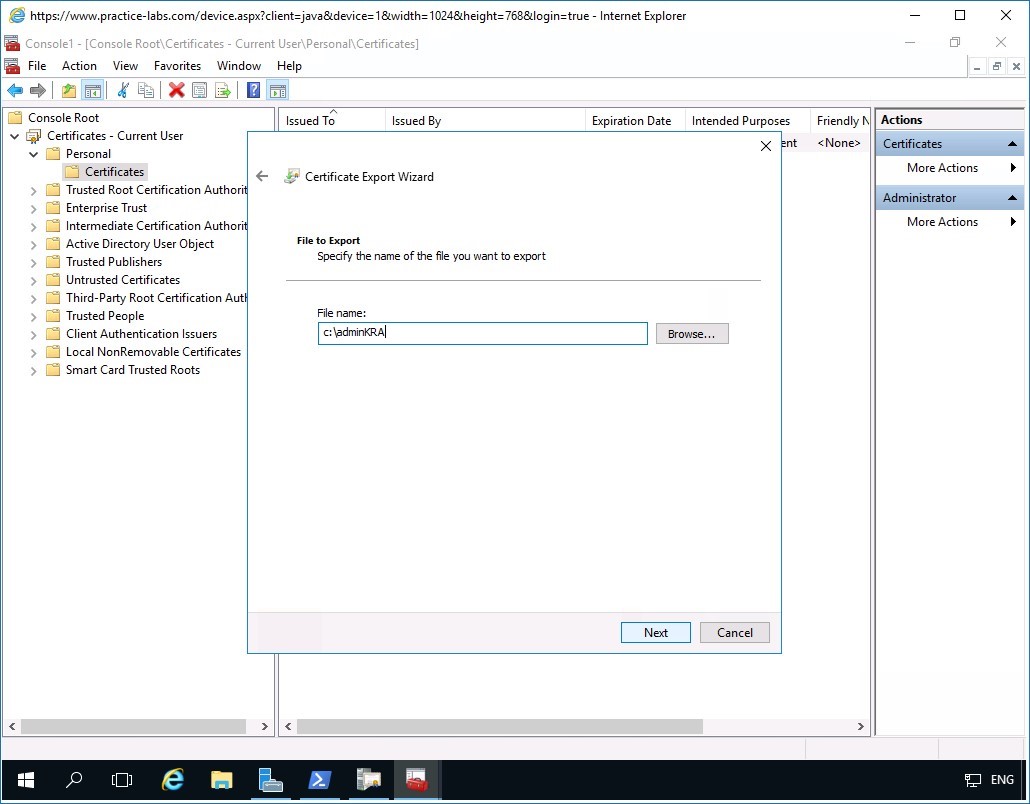
Step 7
In the File to Export page, click File name box and type:
c:\adminKRA
Please note that the extension name .pfx will be added automatically.
Click Next.
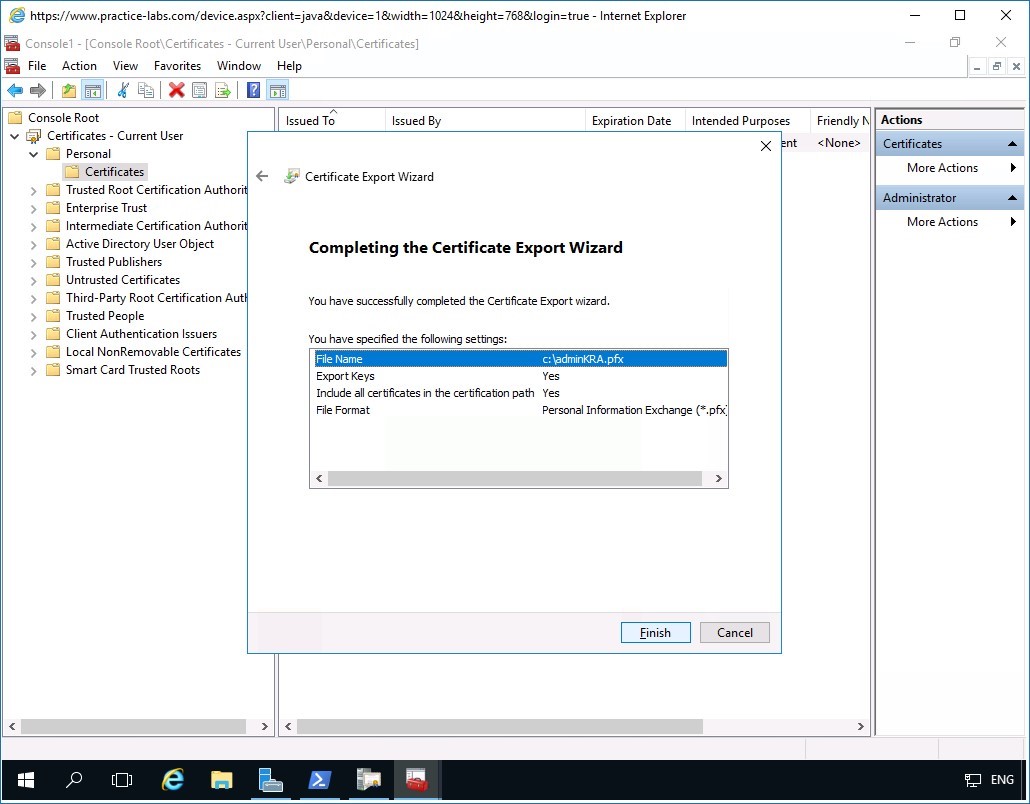
Step 8
Click Finish when Completing the Certificate Export Wizard page is displayed.
Step 9
Click OK when Windows notifies you that the certificate export was successful.
Step 10
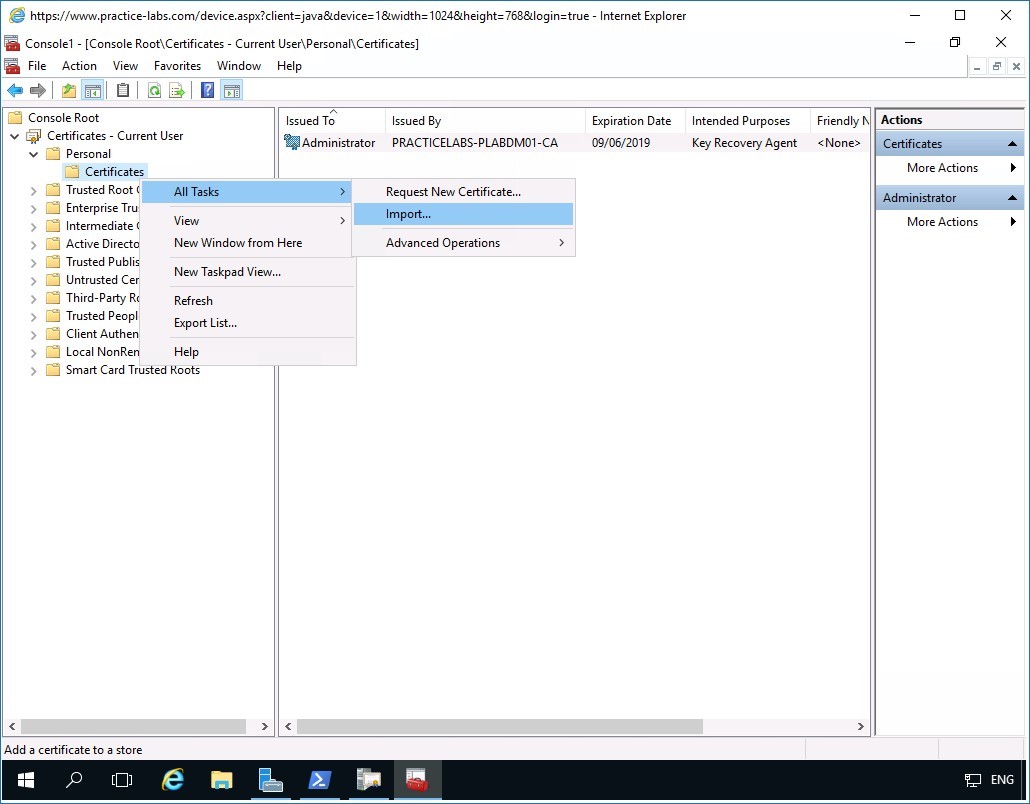
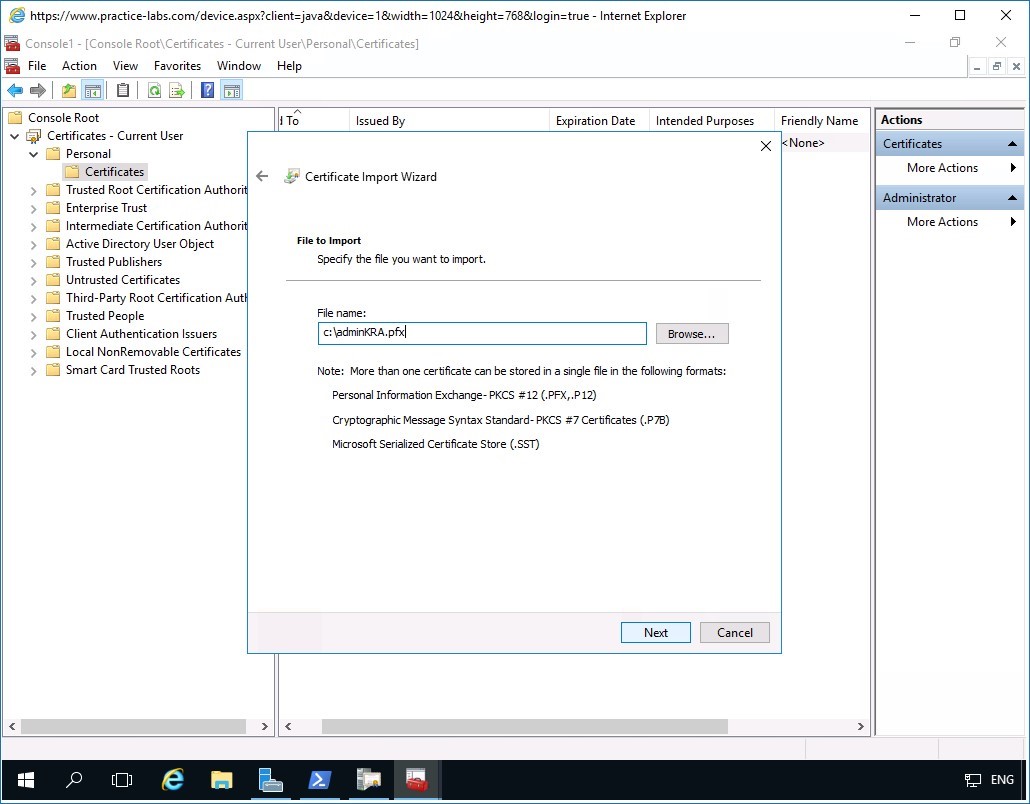
After exporting the .cer to .pfx in the previous example, you will import the .pfx file back into Console1.
The Administrator needs the .pfx file to be able to recover archived keys from the CA server.
From Console1, select Personal folder right-click Certificates point to All Tasks then select Import
Step 11
In the Welcome to the Certificate Import Wizard, click Next.
Step 12
In the File to Import page, click in the File name text box and type:
c:\adminKRA.pfx
Click Next.
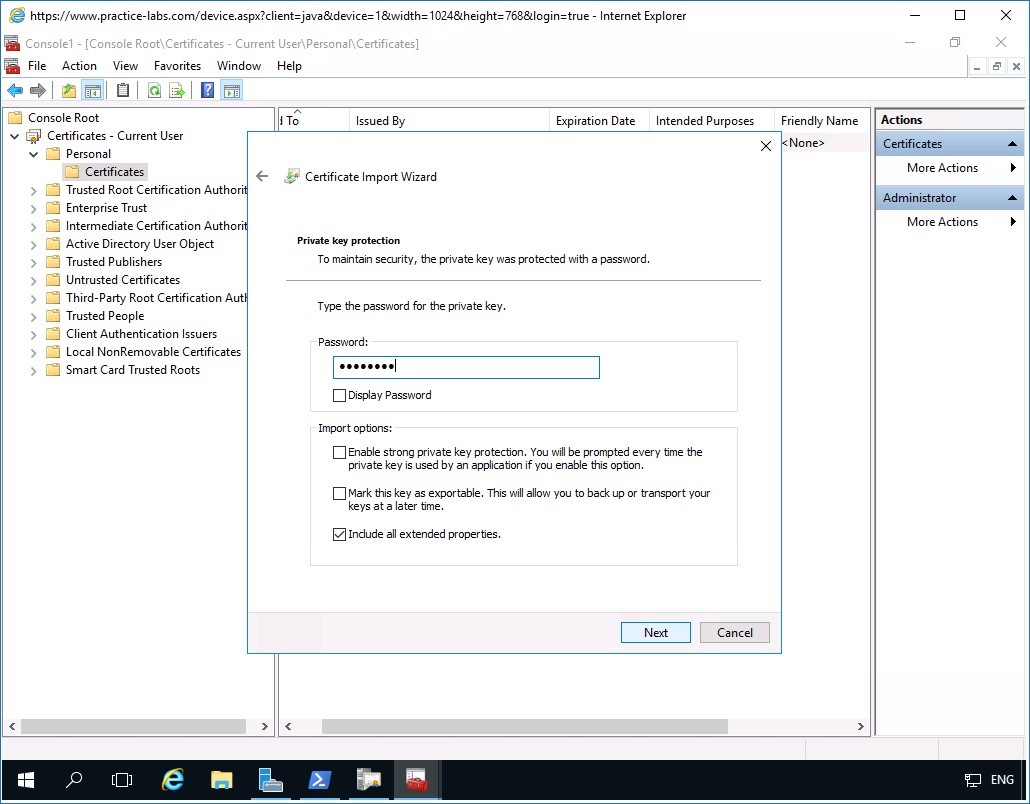
Step 13
In the Private key protection page, in the Password text box, type:
Passw0rdClick Next.
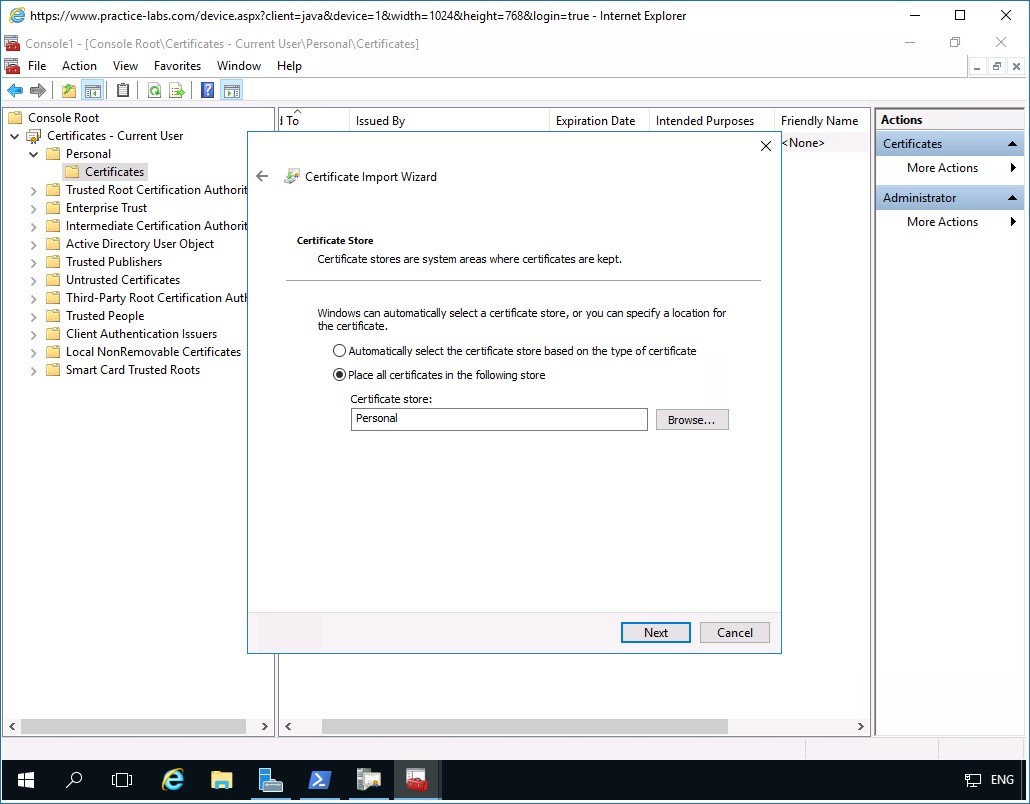
Step 14
In the Certificate Store page, verify that Place all certificates in the following store is selected.
Click Next.
Step 15
In the Completing the Certificate Import Wizard page, click Finish.
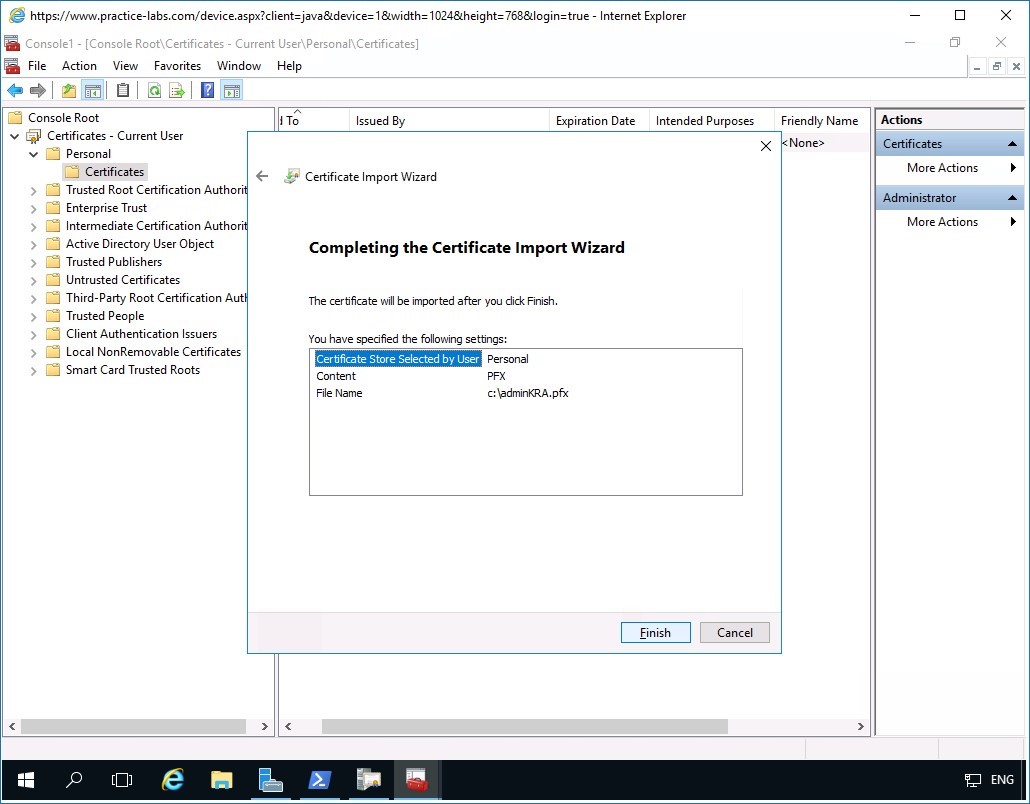
Step 16
Click OK when the system tells you that the import was successful.
Step 17
Notice that a second certificate has been added to the list.
Minimize Console1 window.
Step 18
Restore the Certification Authority console window from taskbar if not yet open.
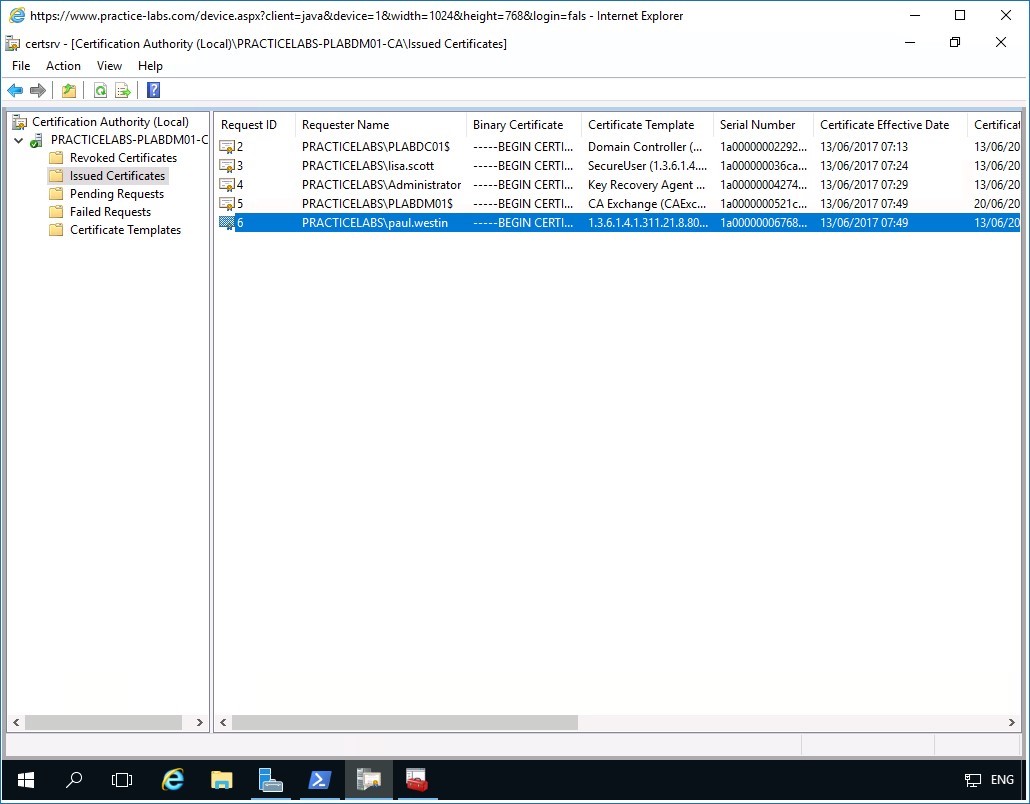
Click Issued Certificates folder.
Locate the column Requester name by expanding the column header and find PRACTICELABS\paul.westin.
Please note the requester name indicated above as you will recover the archived certificate of this user account.
Task 2 - Using CERTUTIL to recover archived keys
To run the certutil.exe to recover archived keys in the PLABDM01 server, perform the following steps:
Step 1
On PLABDM01 computer, right-click Start and select Command Prompt (Admin) from the shortcut menu.
Step 2
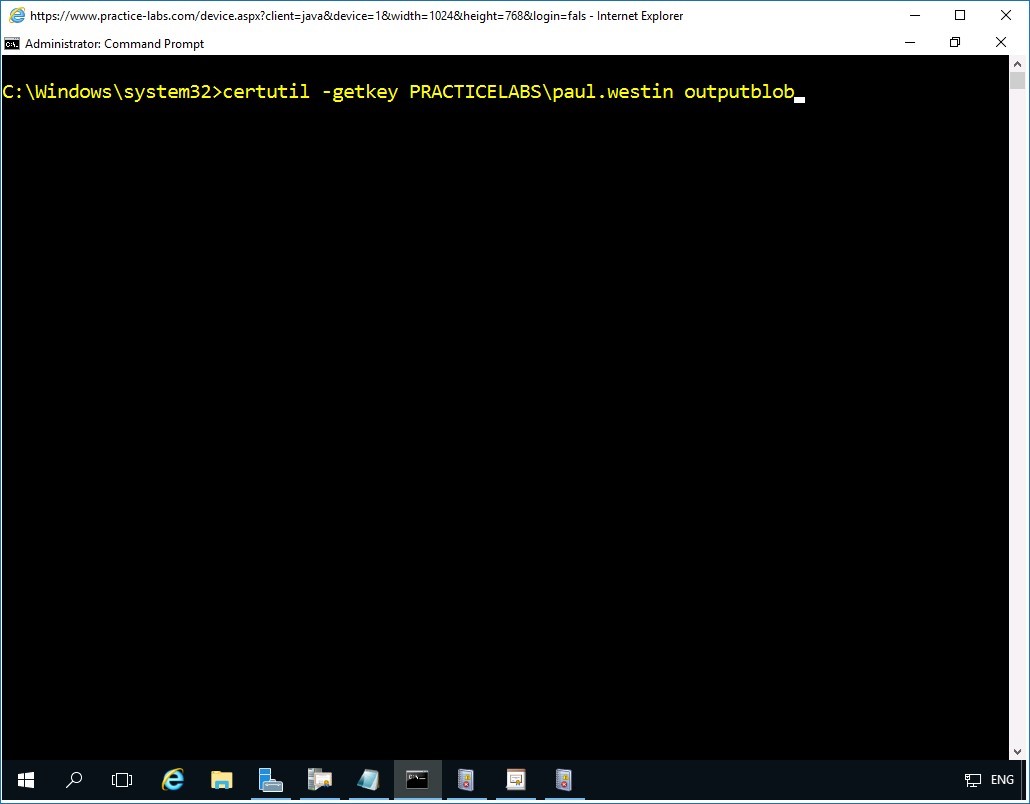
In the command prompt type the following:
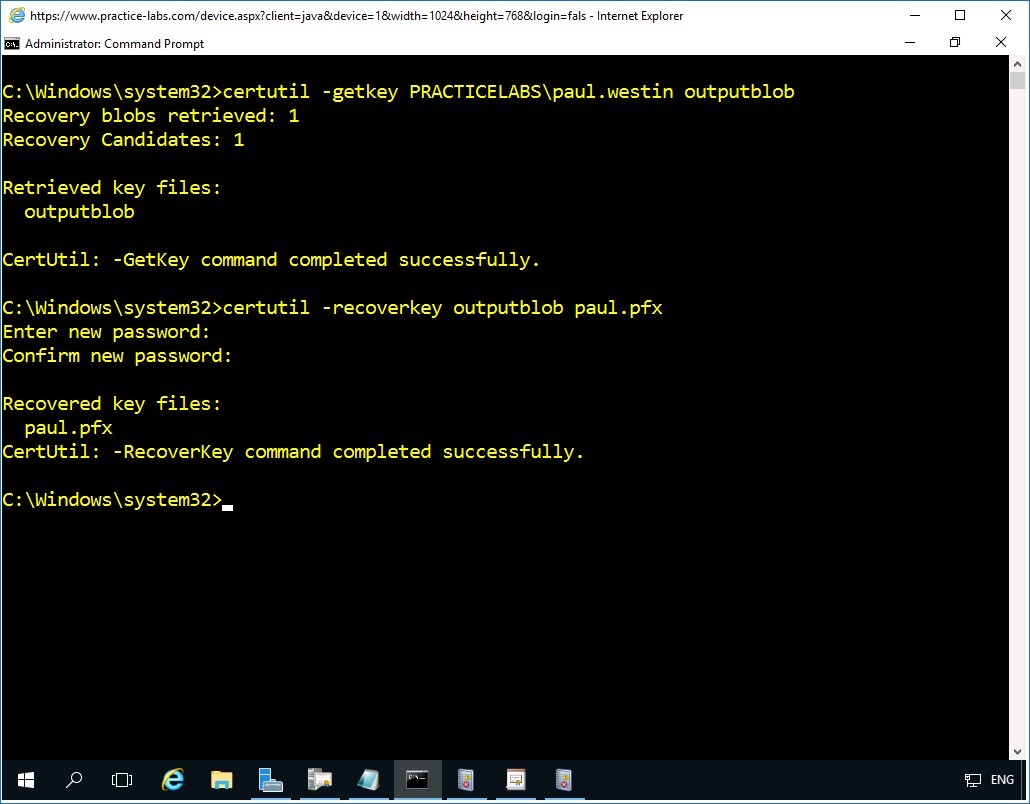
certutil -getkey PRACTICELABS\paul.westin outputblob
Press Enter.
Step 3
On the command prompt window, click the Command prompt icon on the top left corner.
Click Edit and select Paste.

Step 4
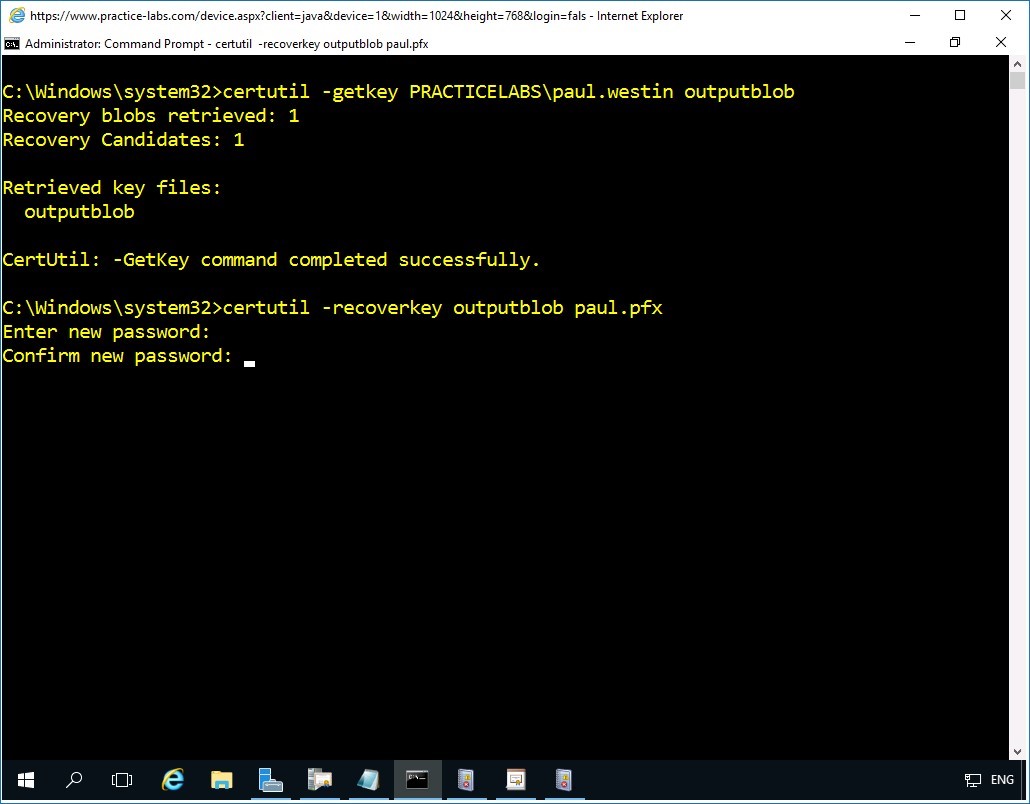
To create a certificate that can unlock the encrypted file, you need to create a .PFX file from the retrieved key file.
Type the following
certutil -recoverkey outputblob paul.pfx
Press Enter.
In the Enter new password prompt, type:
Passw0rdPress Enter.
In the Confirm new password prompt, type:
Passw0rdPress Enter.
Step 5
The .PFX file called paul.pfx is successfully created.
Step 6
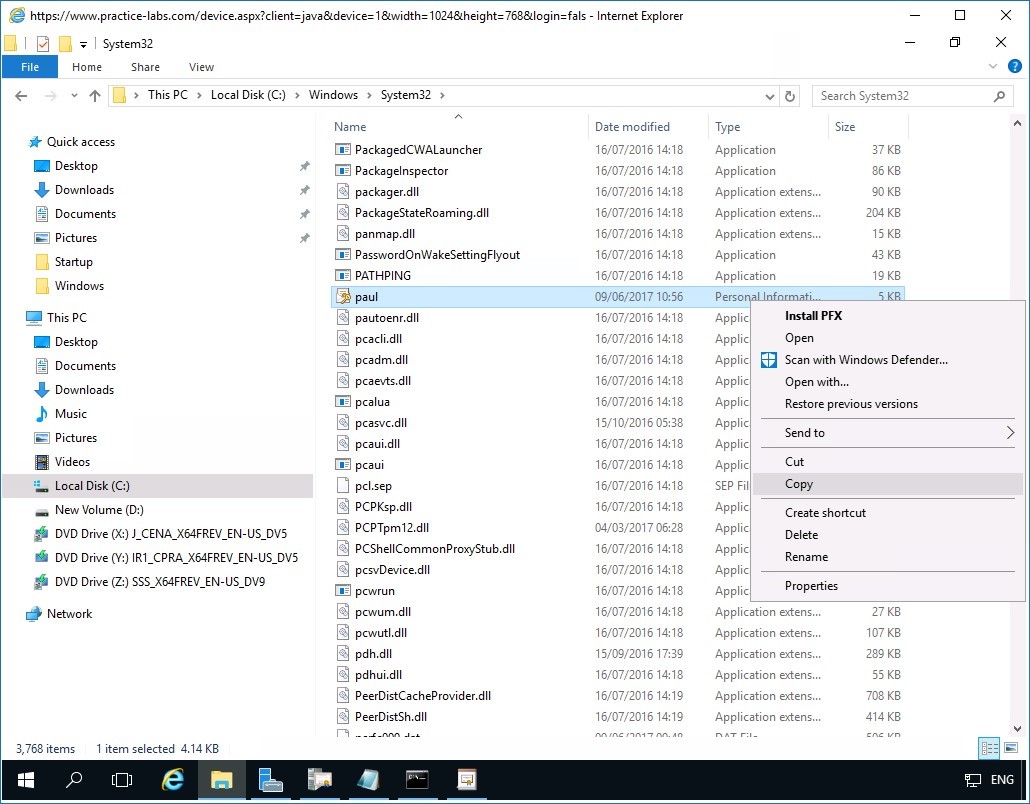
Open File Explorer, navigate to Local Disk C > Windows > system32 folder.
Scroll down the list and locate paul - Personal Information file type.
Note that the file will look like a certificate with a key appended to it.
Right-click on paul and select Copy.
Step 7
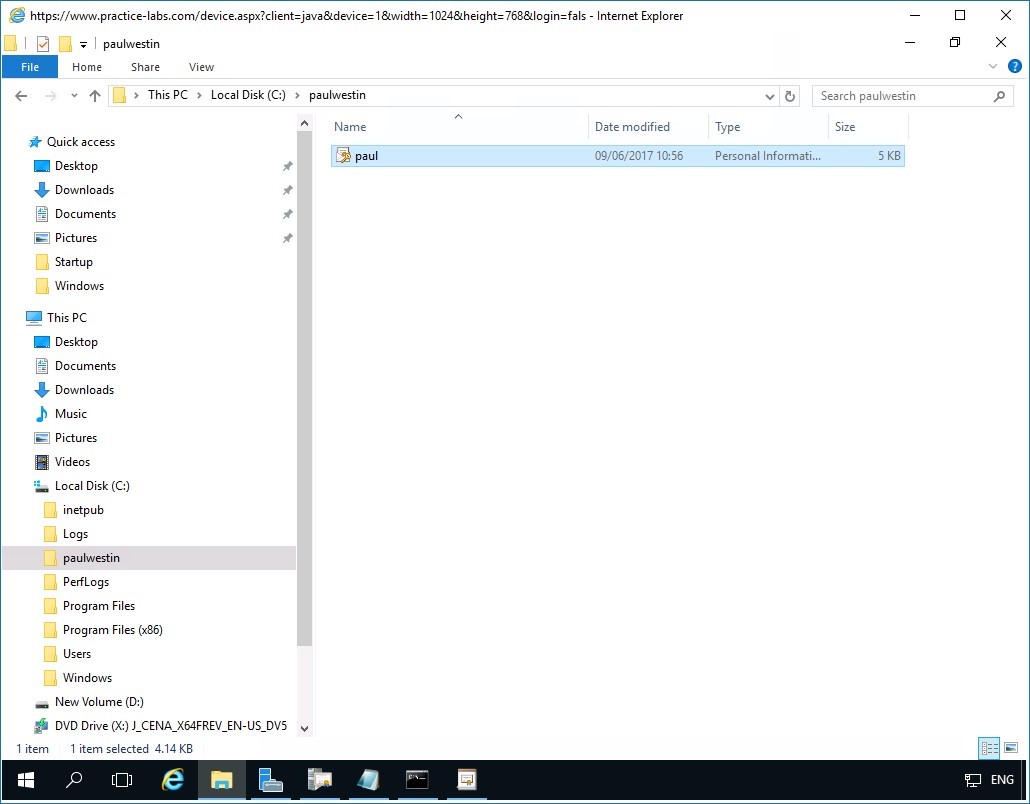
Create a folder on Local Disk C: called paulwestin and paste the .pfx certificate file there.
Step 8
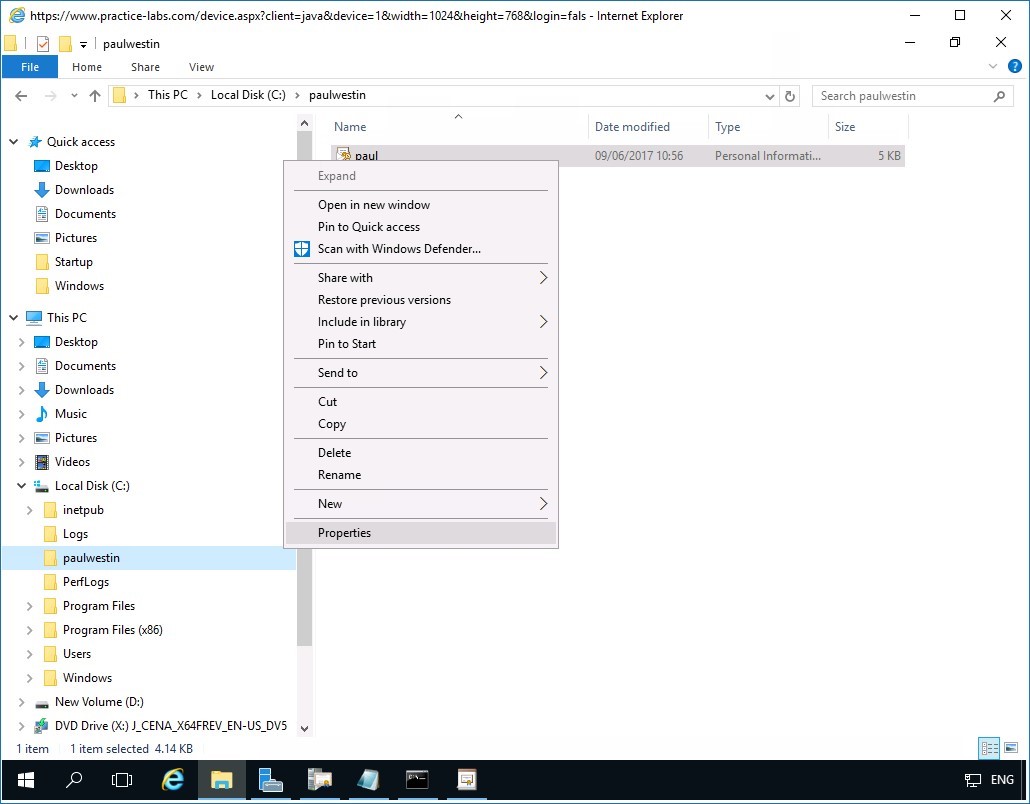
You will share paulwestin folder to allow the user to access the .pfx file over the network.
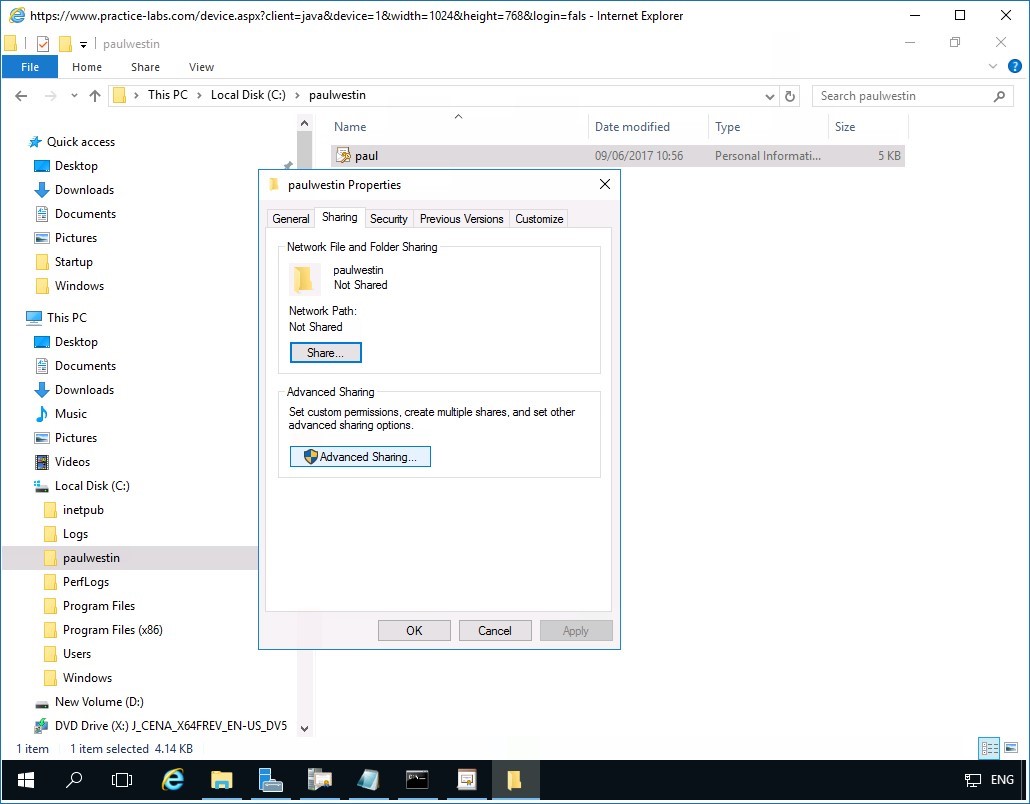
Right-click on paulwestin folder and choose Properties.
Step 9
On the paulwestin Properties window, select Sharing tab.
Step 10
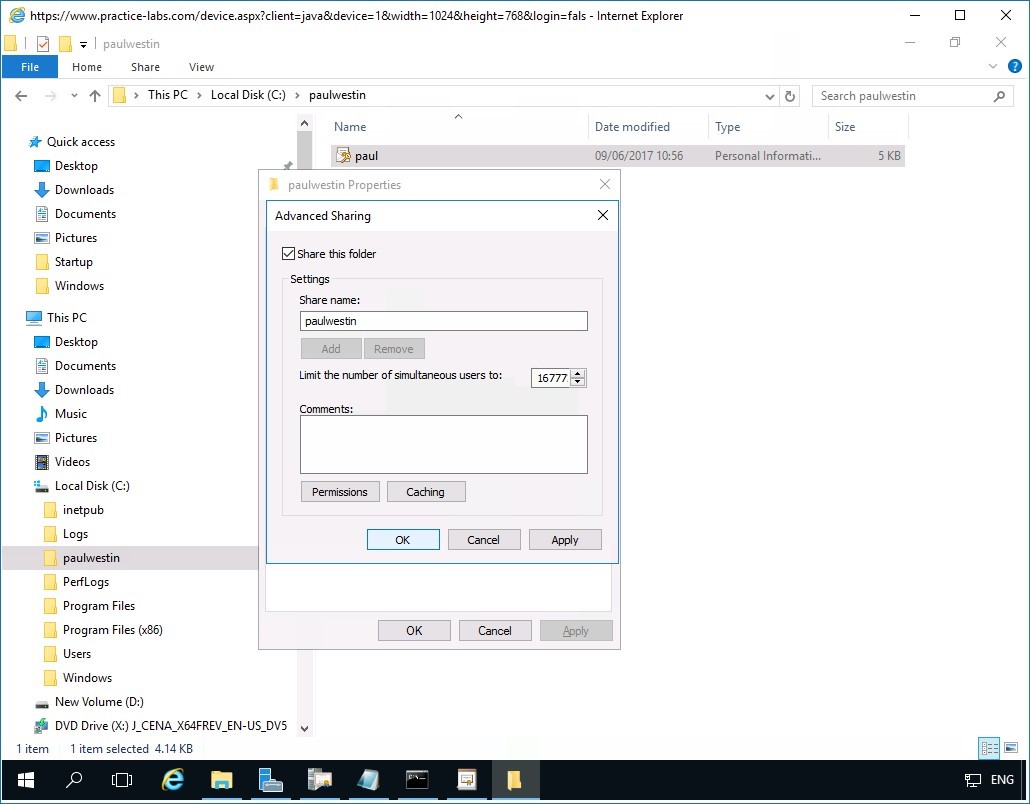
Under the Sharing tab and click on Advanced Sharing.
Step 11
In the Advanced Sharing window, click Share this folder box and then click OK.
Similarly, click Close on the paulwestin folder.
Task 3 - Test user access to encrypted file
To verify that user Lisa Weybridge can access the file that was encrypted earlier, perform the following steps:
Step 1
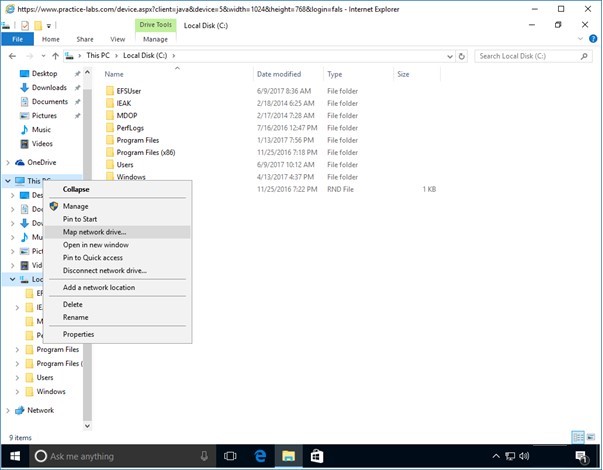
Connect to PLABWIN10 where paul.westin is signed in.
File Explorer is open.
Right-click on This PC, choose Map network drive.
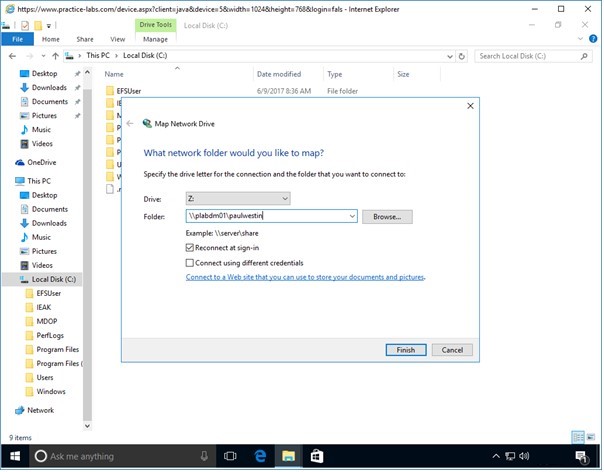
Step 2
In the Map network drive window, in the Folder text box, type:
\\plabdm01\paulwestin
Click Finish.
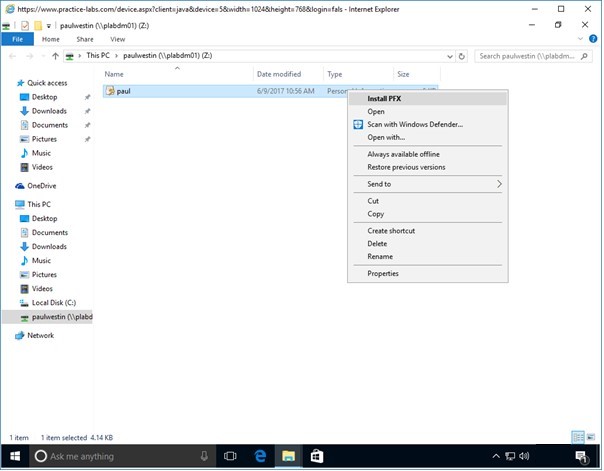
Step 3
A new File Explorer window opens indicating a successful connection.
Once connected right-click on paul.pfx file and choose InstallPFX.
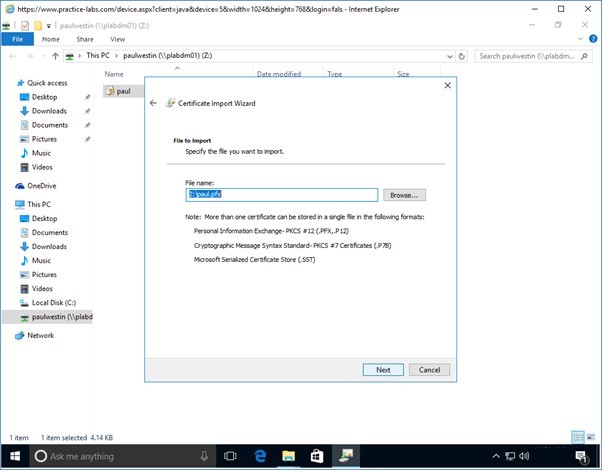
Step 4
In the Welcome to the Certificate Import Wizard page, click Next.
Step 5
The File to Import page, displays the path of the .pfx file.
In this case it is in z:\paul.pfx path.
Click Next.
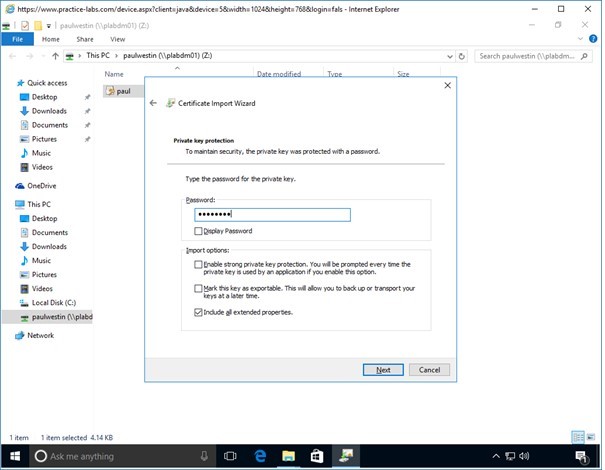
Step 6
In the Private key protection page, type:
Passw0rdClick Next.
Step 7
In the Certificate Store page, the Automatically select the certificate store based on the type of certificate option is selected.
Click Next.
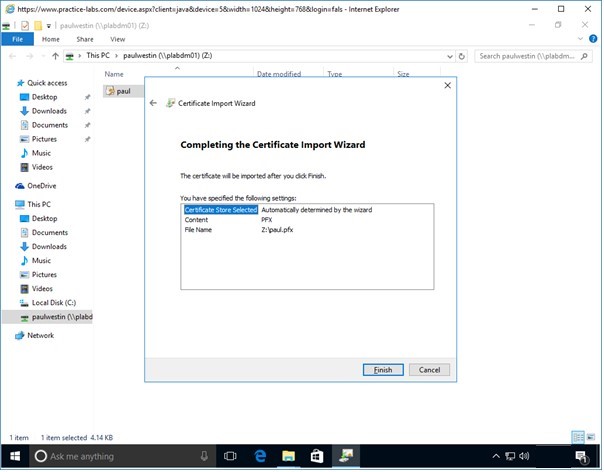
Step 8
When Completing the Certificate Import Wizard page shows up, click Finish.
Step 9
Click OK when import is successful.
Step 10
Back on File Explorer window, navigate to Local Disk C then click EFSUser folder.
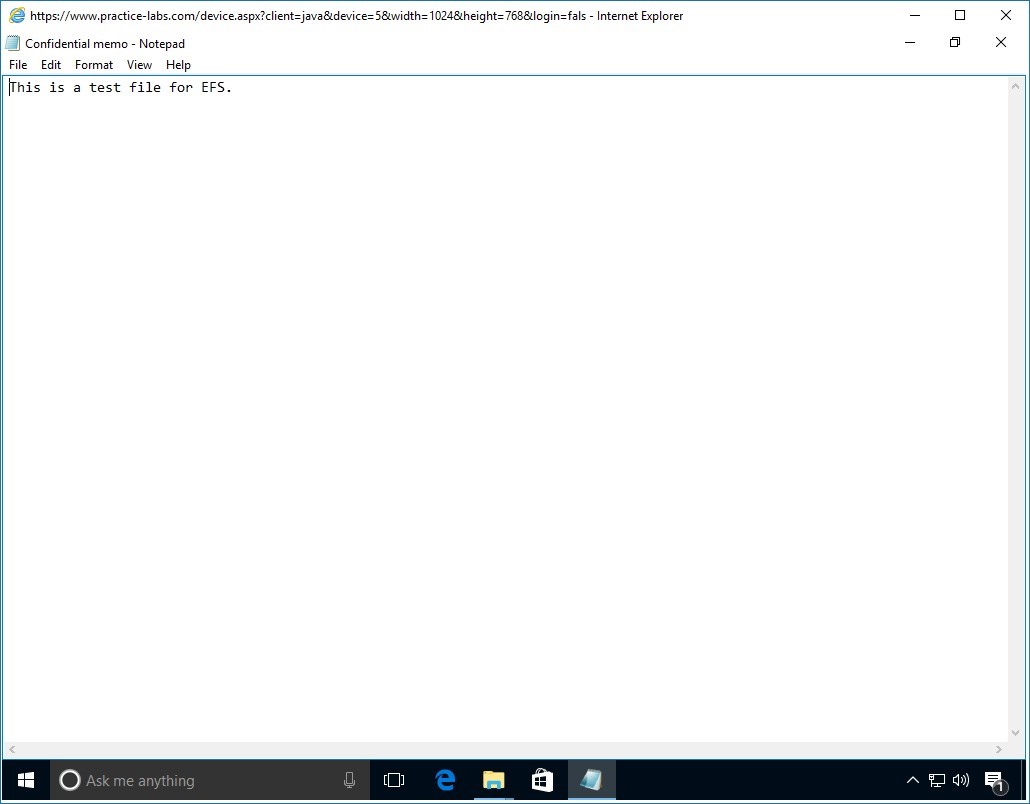
Right-click on Confidential memo then select Open.
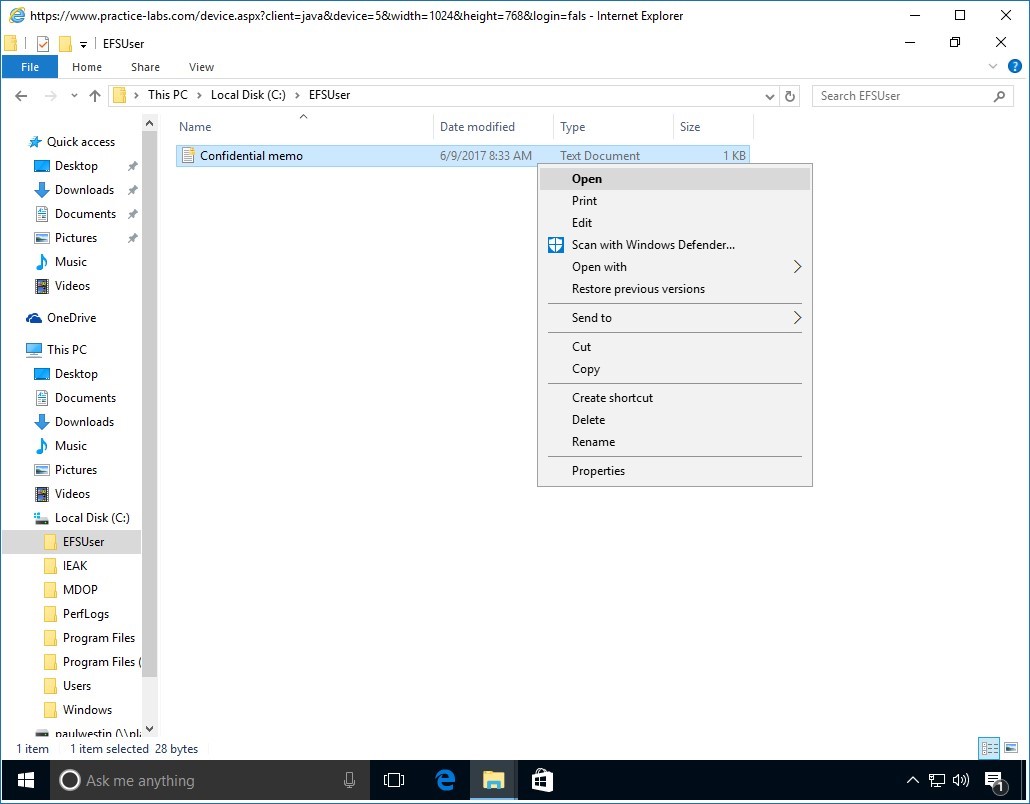
Step 11
Paul should be able to read the contents of the confidential file.
Paul Westin’s key was recovered successfully.
Task 4 - Enable server auto login
By default, when you connect to a device in Practice Labs you are automatically logged in - usually as the administrator. For this task, you will need to re-enable this feature and so you will be logged in automatically in the next exercise.
Step 1
On the Practice Labs web page, click the Access your settings tab.
Under the Device heading there is an option named Server auto login, click the Enable button.
Result - You have completed the necessary tasks for managing certificate archiving and recovery.
Analyzing Your Digital Evidence
When you analyze digital evidence, your job is to recover the data. If users have deleted or overwritten files on a disk, the disk contains deleted files and file fragments in addition to existing files. Remember that as files are deleted, the space they occupied becomes free space—meaning it can be used for new files that are saved or files that expand as data is added to them.
The files that were deleted are still on the disk until a new file is saved to the same physical location, overwriting the original file. In the meantime, those files can still be retrieved. Forensics tools such as ProDiscover Basic can retrieve deleted files for use as evidence.
To get a better understanding of this technology, please refer to your course material or use your preferred search engine to research this topic in more detail.
In this exercise you will complete the following tasks.
- Using ProDiscovery to Analyze Evidence
- Analyzing Data
- Creating a Report
- View the Report
- Export the Report
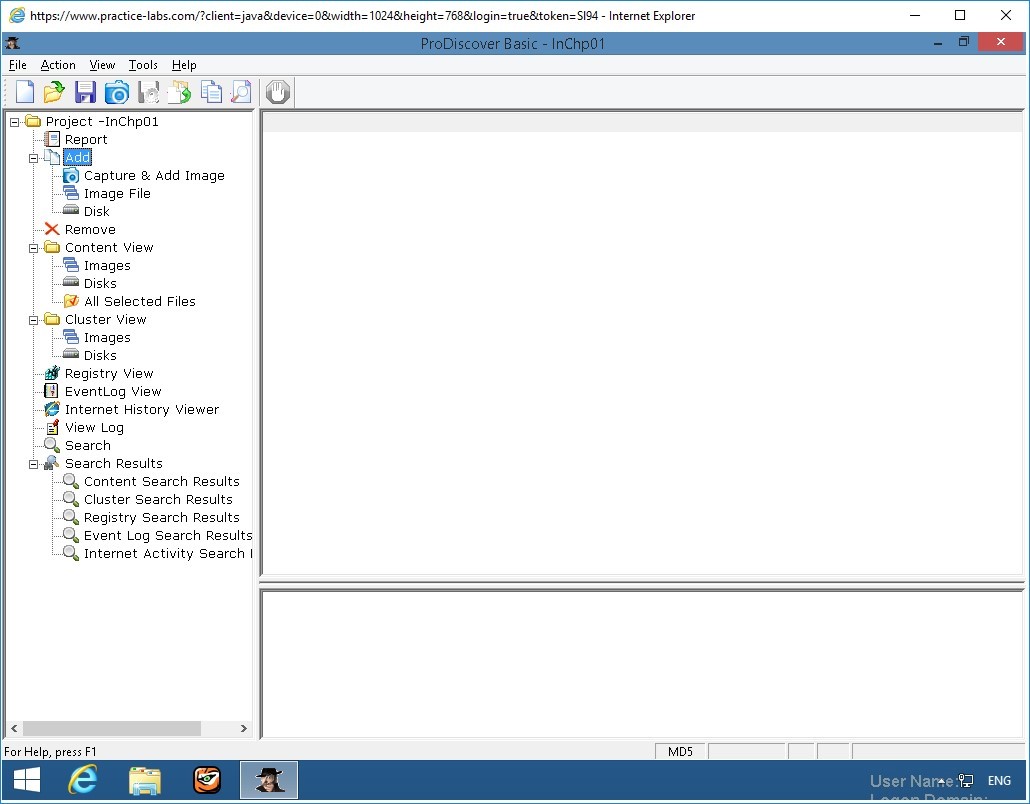
Task 1 - Using ProDiscovery to Analyze Evidence
In the following steps, you analyze George Montgomery’s drive. The first task is loading the acquired image into ProDiscover Basic by following these steps:
Step 1
On PLABWIN810 device, start ProDiscover Basic 64 as you did in the previous activity.

Step 2
Click Cancel on the ProDiscover Launch Dialog box.
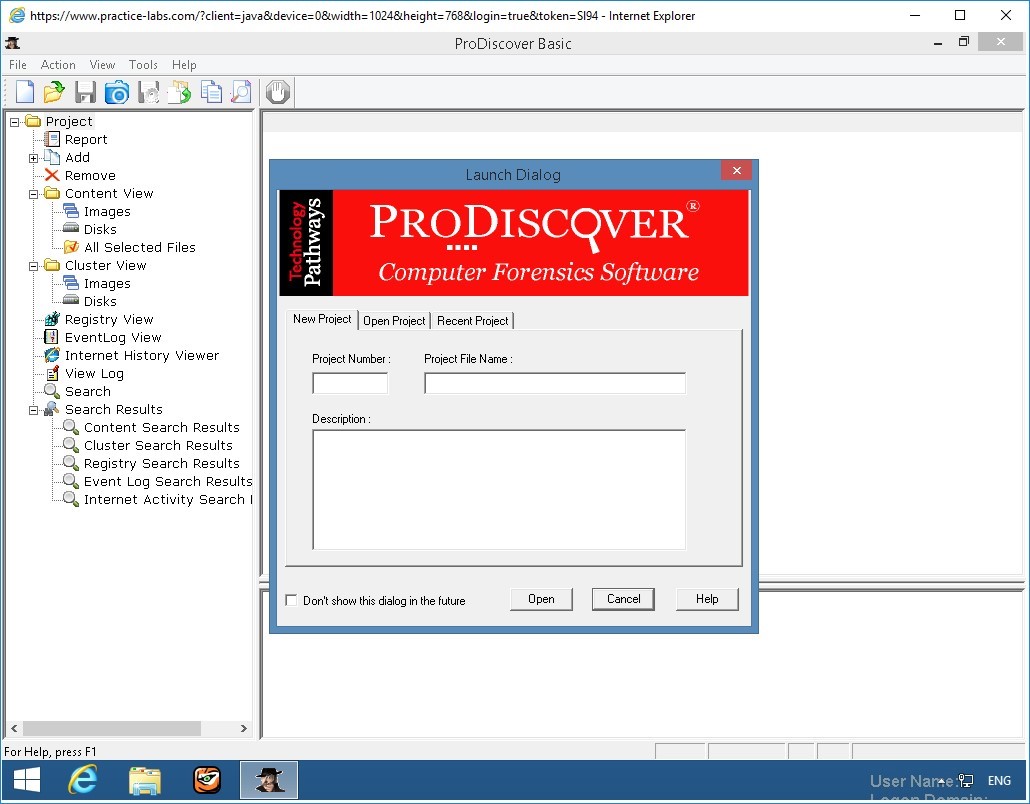
Step 3
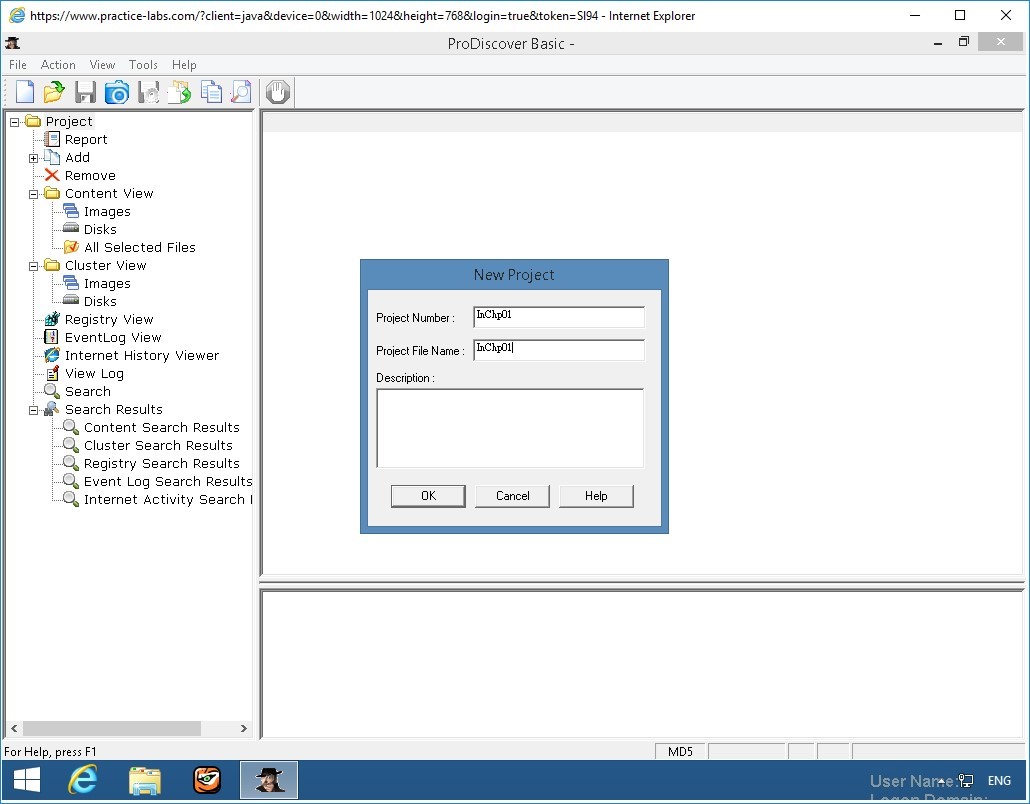
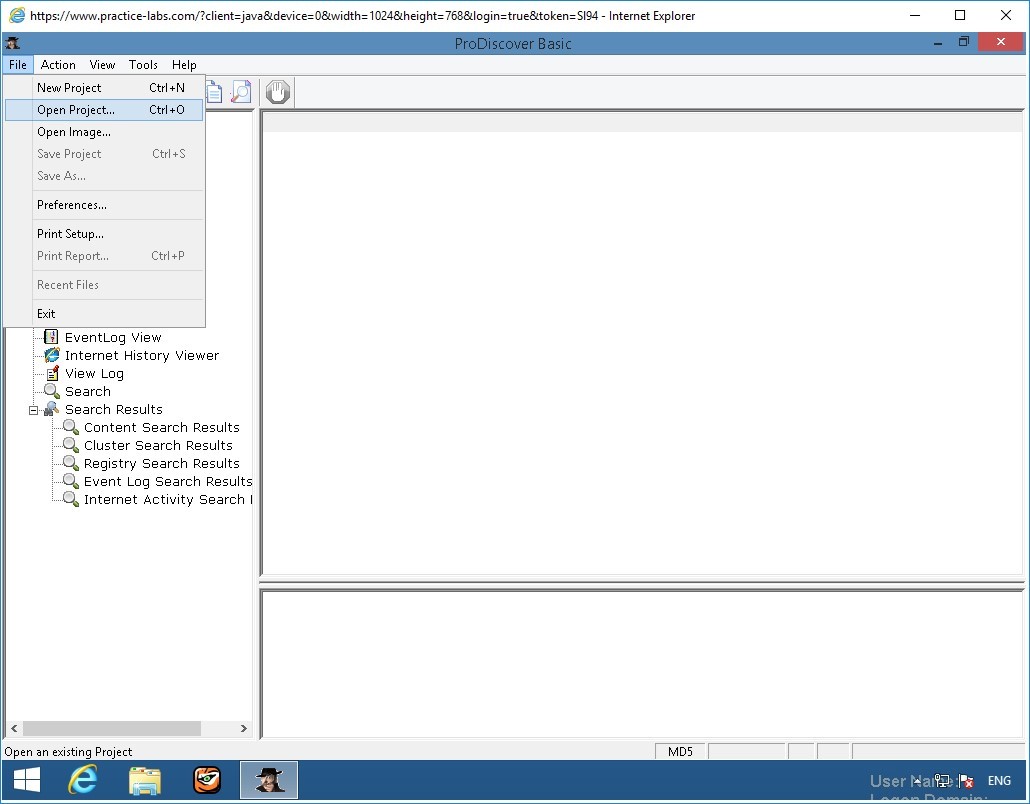
To create a new case, click File, New Project from the menu.

Step 4
In the New Project dialog box, in the Project Number text box and again in the Project File Name text boxes, type:
InChp01
Click OK.
Step 5
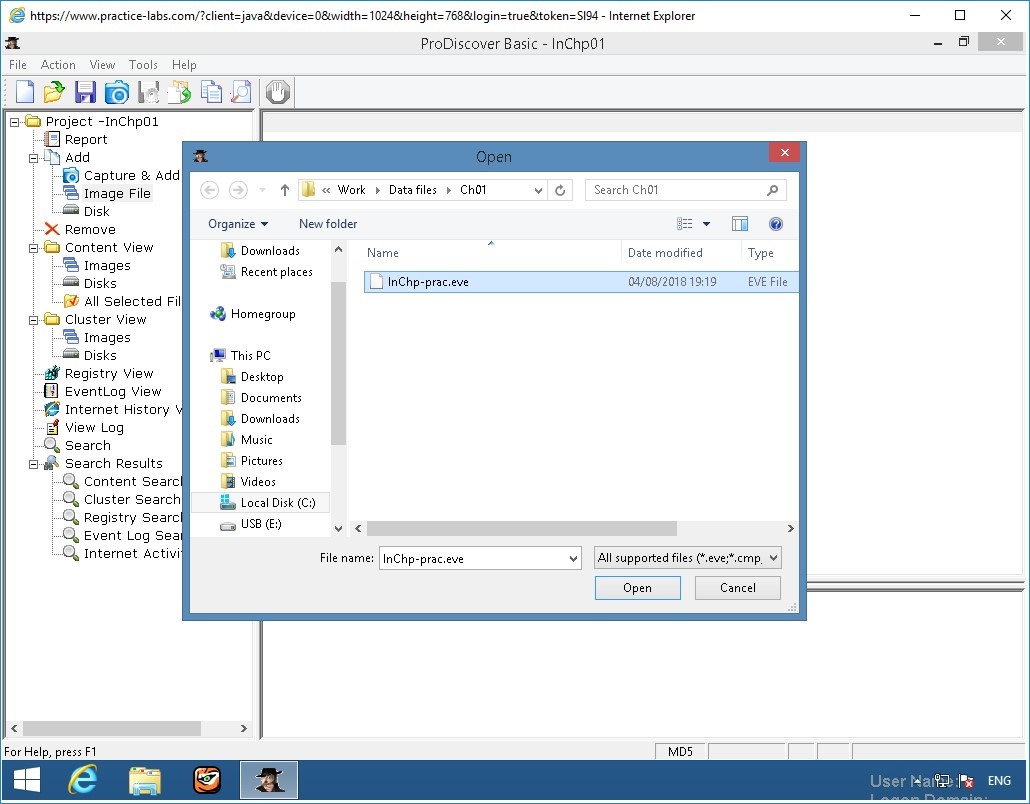
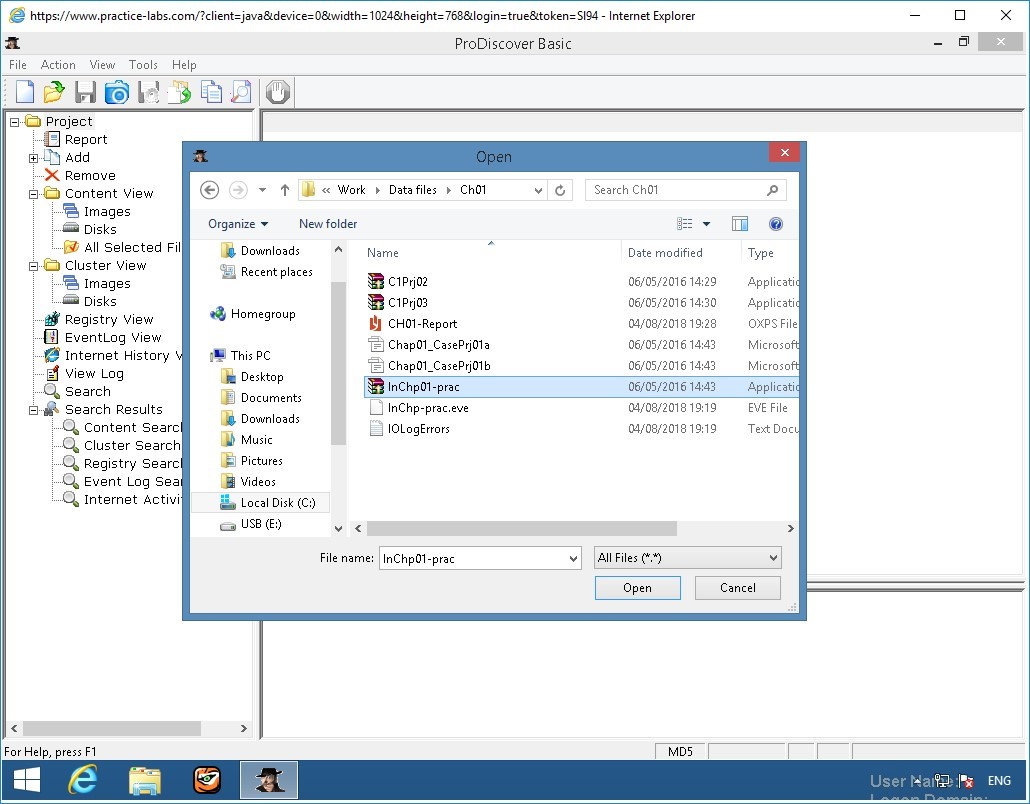
In the tree view of the main window, click to expand the Add item, and then click Image File.
Step 6
In the Open dialog box, you will be redirected to the folder c:\Work > Data files > Ch01 containing the image, click the InChp01-prac.eve file.
Click Open.
Step 7
Click Yes in the Auto Image Checksum message box, if necessary.
The next task is to display the contents of the acquired data.
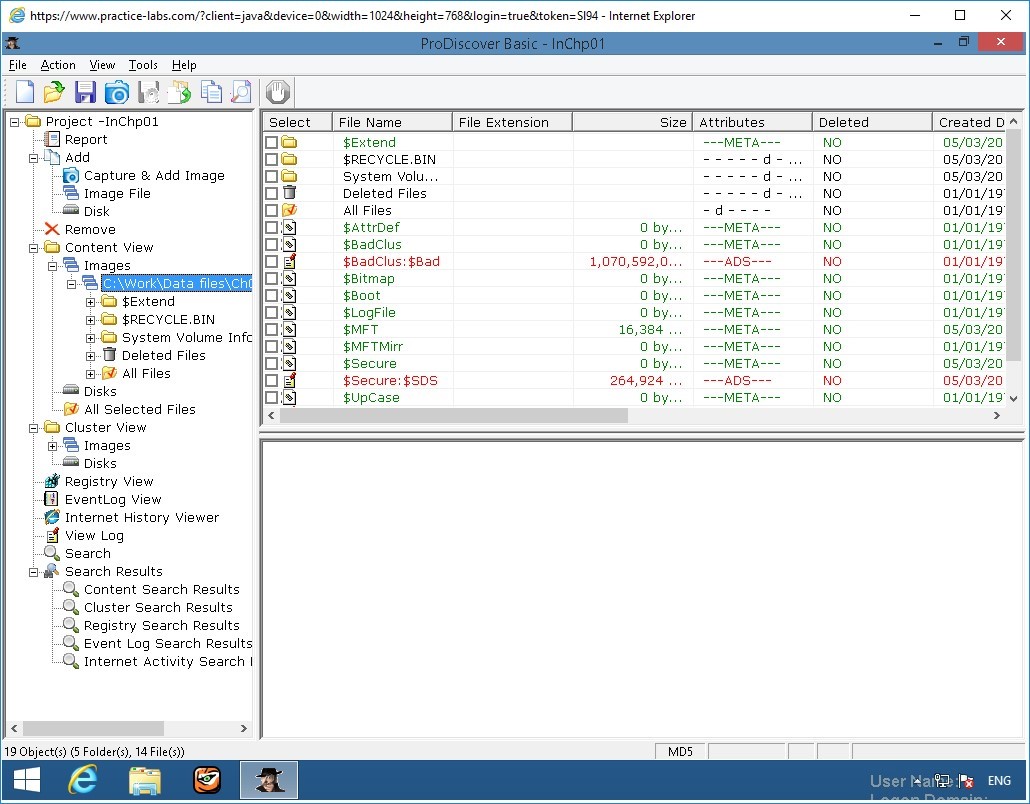
In the tree view, click to expand Content View, if necessary.
Click to expand Images, and click the image filename path C:\Work\Chap01\Chapter\InChp01-prac.eve.
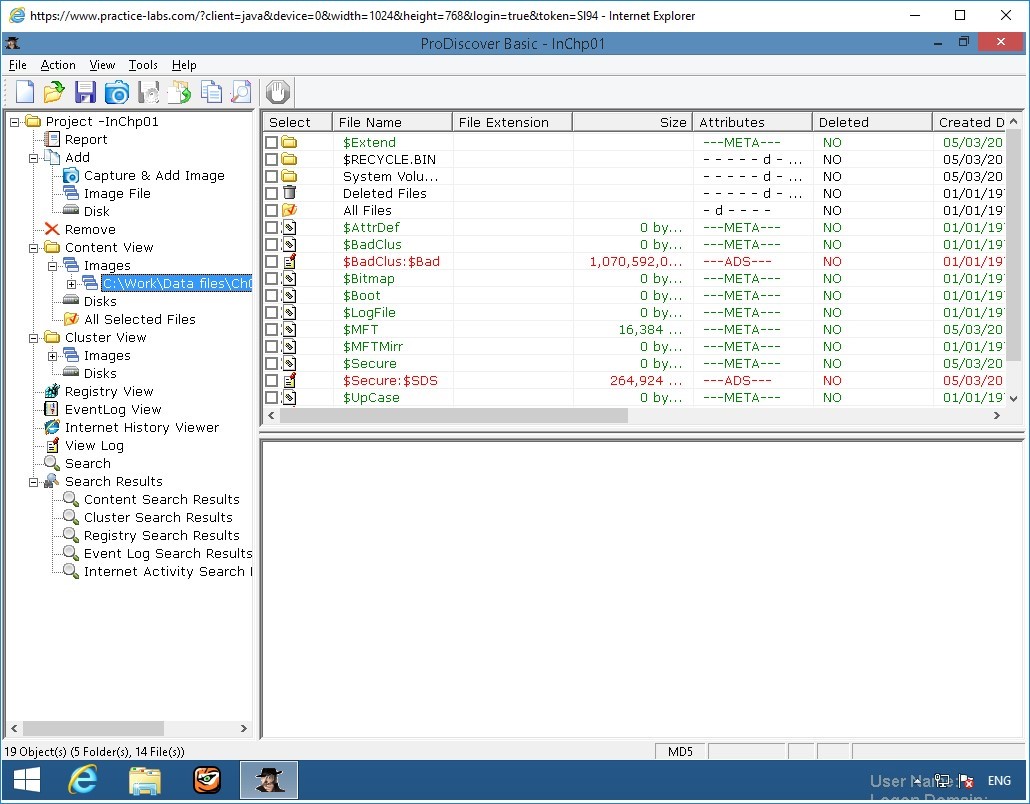
Step 8
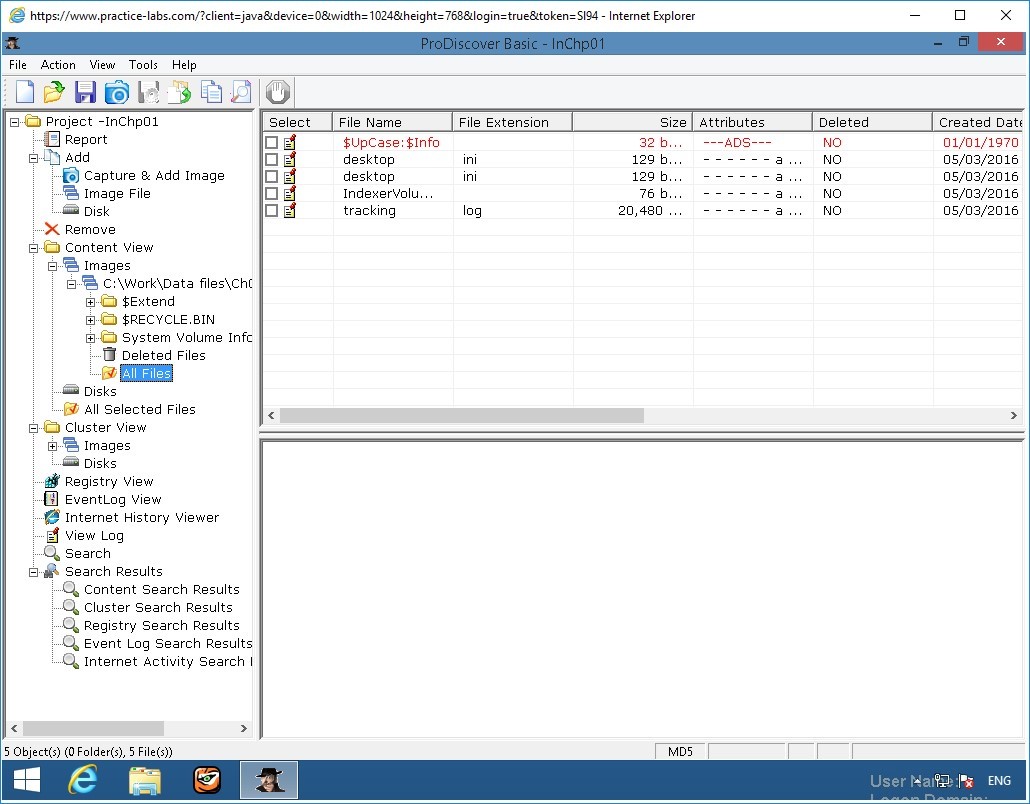
Next, click the + in front of the image file pathname, and then click All Files under the image filename path.
Step 9
When the ProDiscover - CAUTION dialog box opens, click Yes.
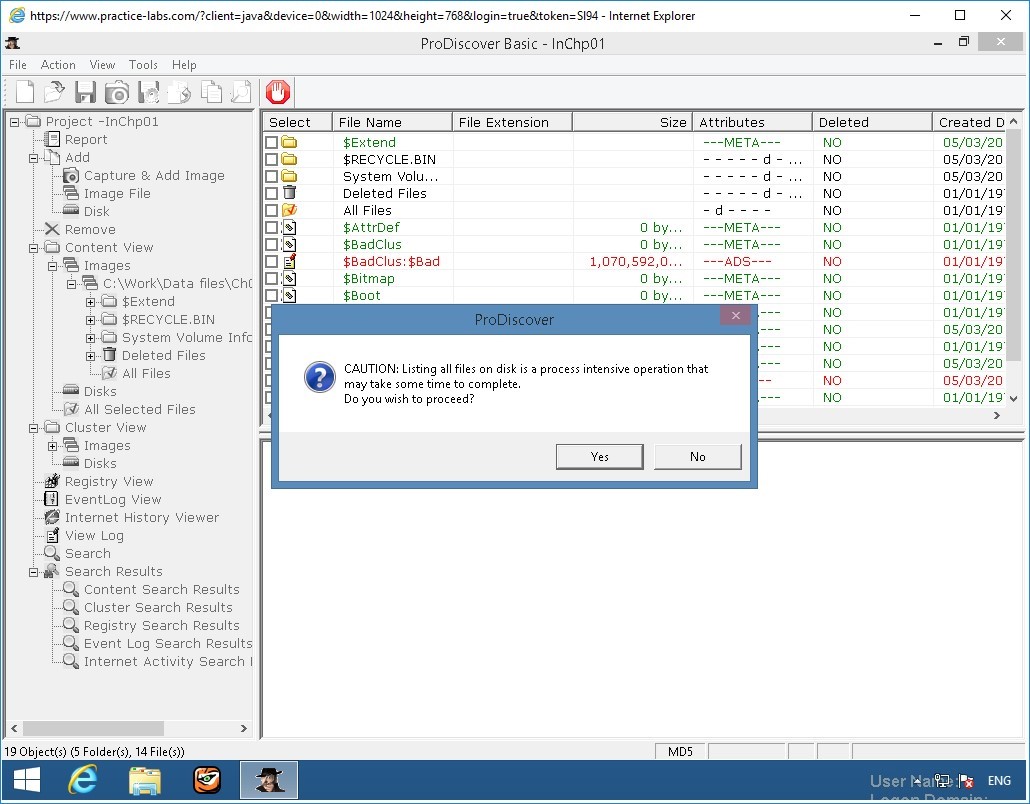
Step 10
The InChp01-prac.eve file is then loaded in the main window.
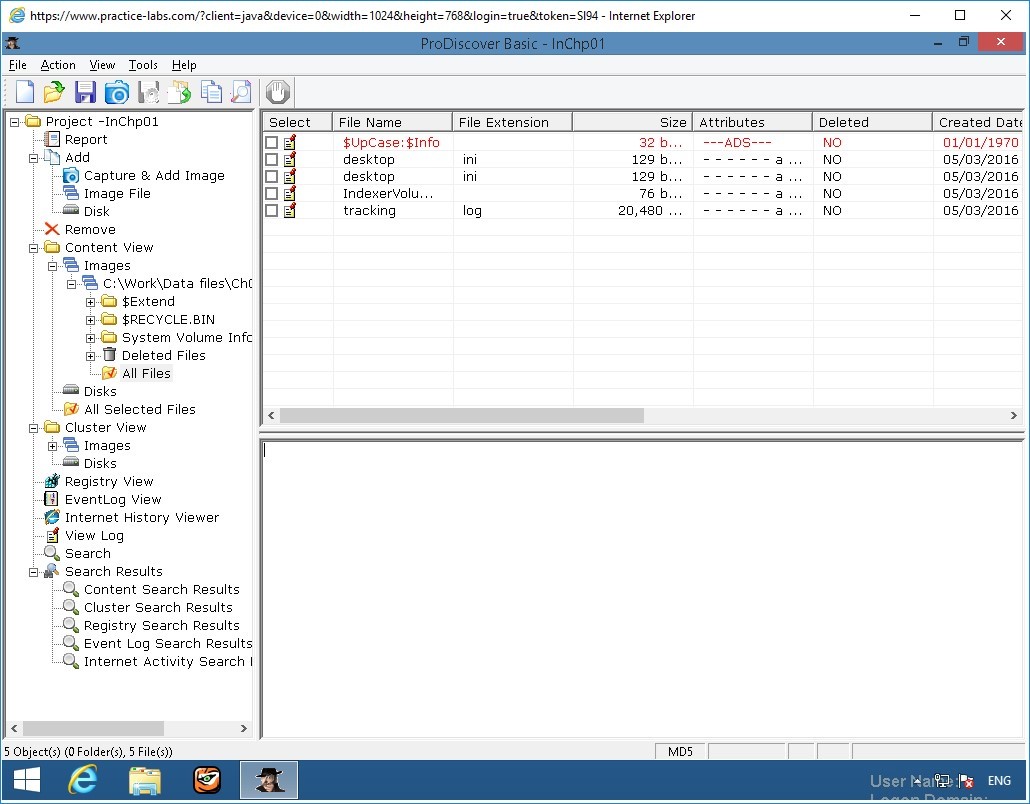
Step 11
In the upper-right pane (the work area), click the tracking.log file to view its contents in the data area.
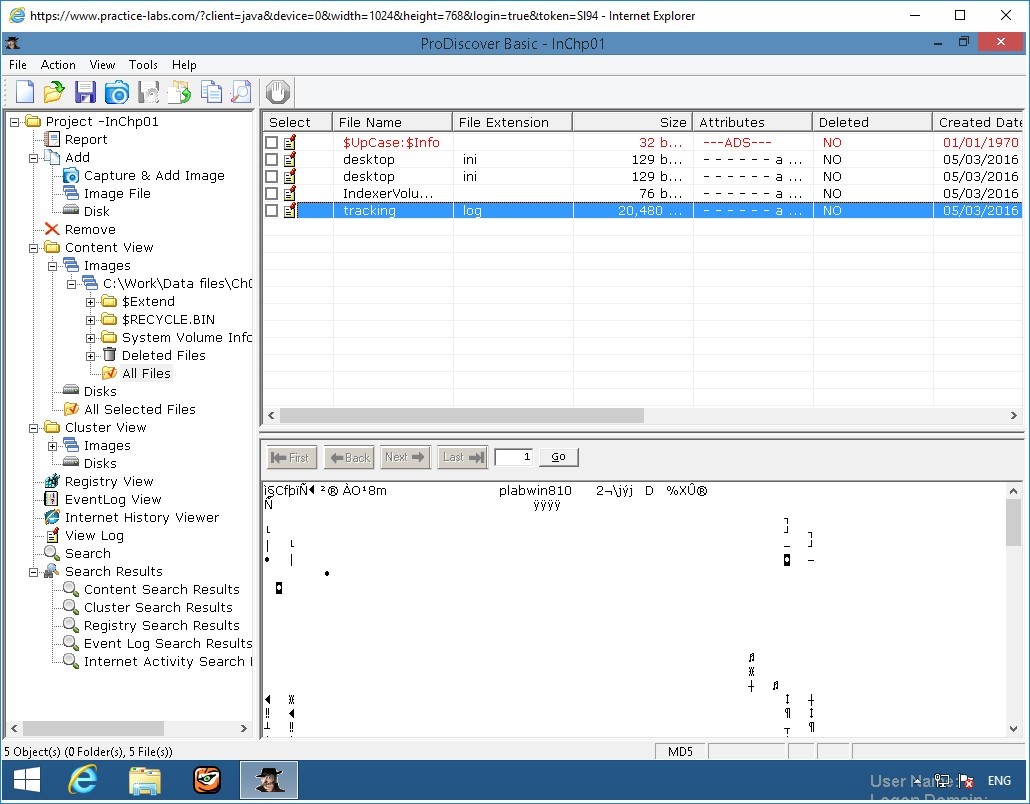
Step 12
In the data area, you see the contents of the tracking.log file. Continue to navigate through the work and data areas and inspect the contents of the recovered evidence.
Leave ProDiscover Basic running for the next activity.
Keep the ProDiscover Basic - InChp01 window open.

Keep the device powered on in their current state and proceed to the next task.
Task 2 - Analyzing data
The next step is analyzing the data and searching for information related to the complaint. Data analysis can be the most time-consuming task, even when you know exactly what to look for in the evidence. The method for locating evidentiary artifacts is to search for specific known data values. Data values can be unique words or nonprintable characters, such as hexadecimal codes. There are also printable character codes that can’t be generated from a keyboard, such as the copyright (ª) or registered trademark (TM) symbols. Many digital forensics programs can search for character strings (letters and numbers) and hexadecimal values, such as A9 for the copyright symbol or AE for the registered trademark symbol. All these searchable data values are referred to as “keywords.” With ProDiscover Basic, you can search for keywords of interest in the case. For this case, follow these steps to search for any reference to the name George:
Step 1
On PLABWIN810 device, the ProDiscover Basic - InChp-01 window is open.
Ensure that Content View > Images > C:\Work\Data files\Ch01\Inchp-prac.eve then All Files node is selected.
In the tree view, click Search.
Step 2
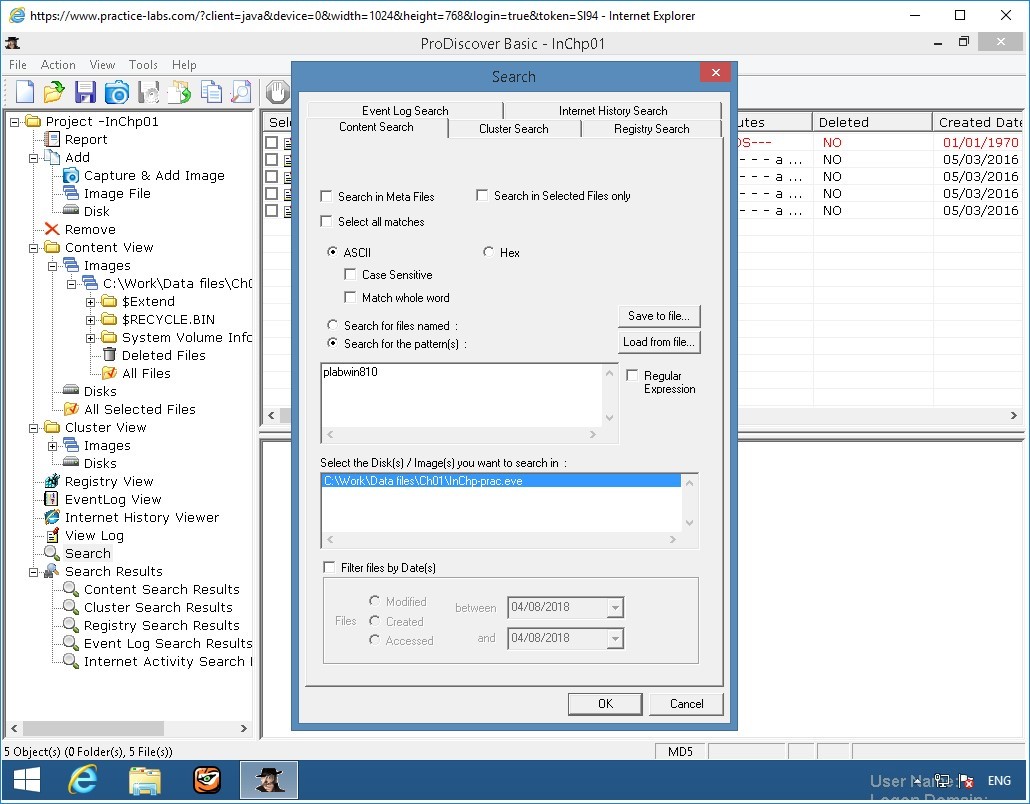
In the Search dialog box, click the Content Search tab, if necessary.
Click the Select all matches check box, the ASCII option button, and the Search for the pattern(s) option button, if they aren’t already selected.

Step 3
Next, in the text box under the Search for the pattern(s) option button, type:
plabwin810

Step 4
Under Select the Disk(s)/Image(s) you want to search in section, click C:\Work\Chap01\Chapter\InChp01-prac.eve (substituting the path to your work folder), and then click OK to start the search.
Step 6
When the search is finished, ProDiscover displays the results in the search results pane in the work area. Note the tabs labeled Search 1.
For each search you do in a case, ProDiscover adds a new tab to help catalog your searches.
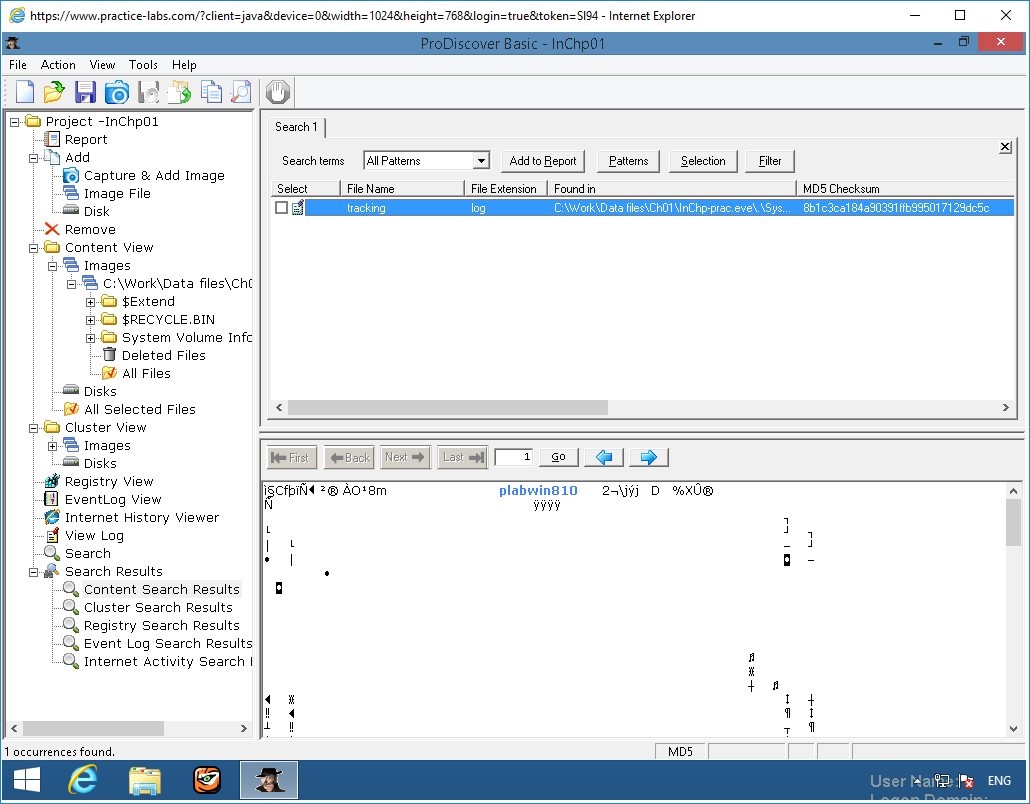
Click tracking.
Notice that tracking.log file is found to contain the string ‘plabwin810.’
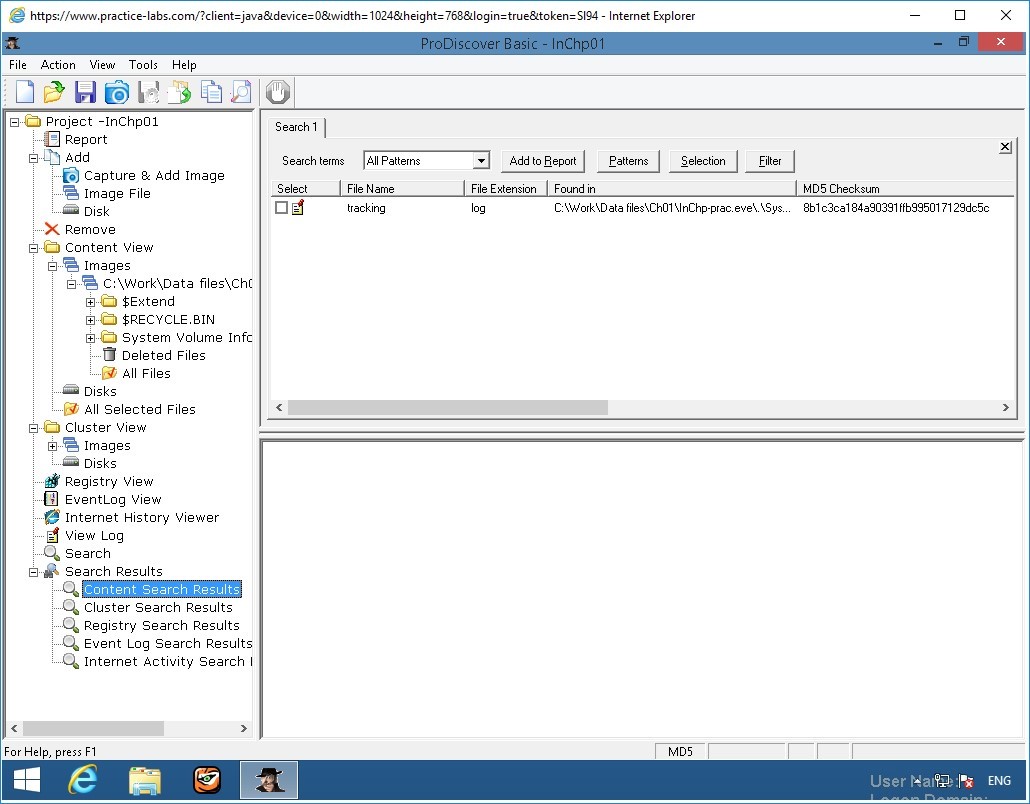
Step 7
Click the Content Search Results node in the search results pane and examine its content in the data area.
Keep the ProDiscover Basic window open.
Keep the device powered on in their current state and proceed to the next task.
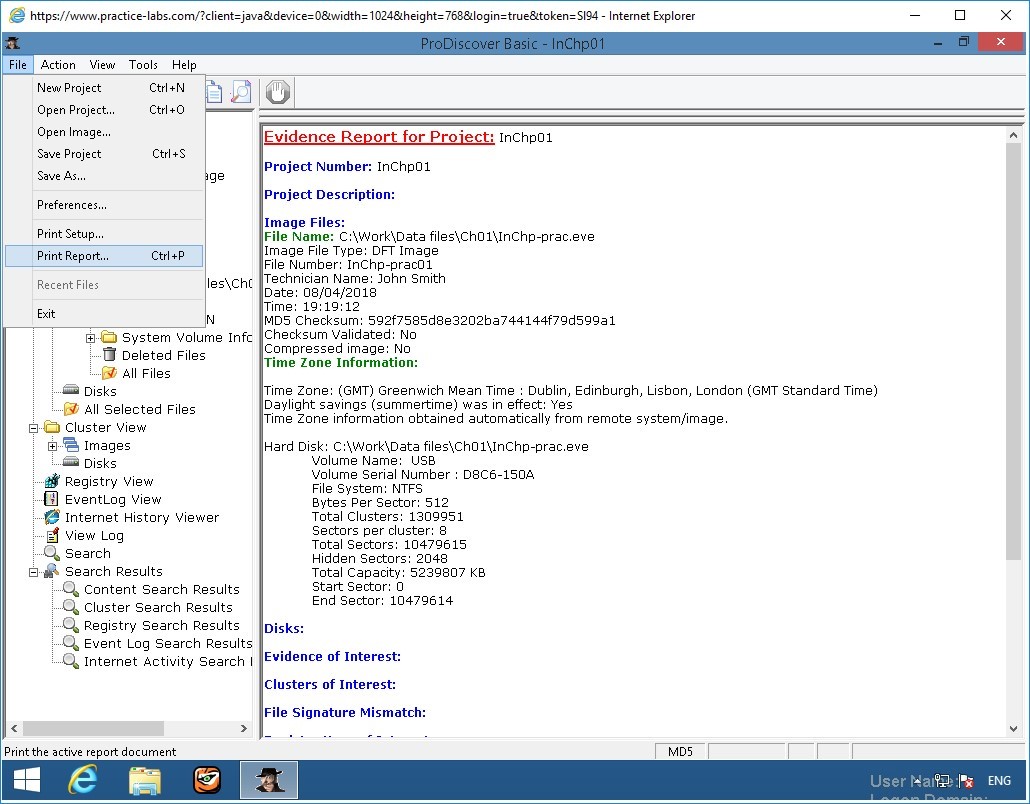
Task 3 - Creating a Report
You can also select specific items and add them to the report. For example, to select a file in the work area, click the check box in the Select column next to the file to open the Add Comment dialog box. Enter a description and click OK. The descriptive comment is then added to the ProDiscover Basic report.
To create a report in ProDiscover Basic, perform the following steps:
Step 1
On PLABWIN810 device, the ProDiscover Basic - InChp01-prac window is open.
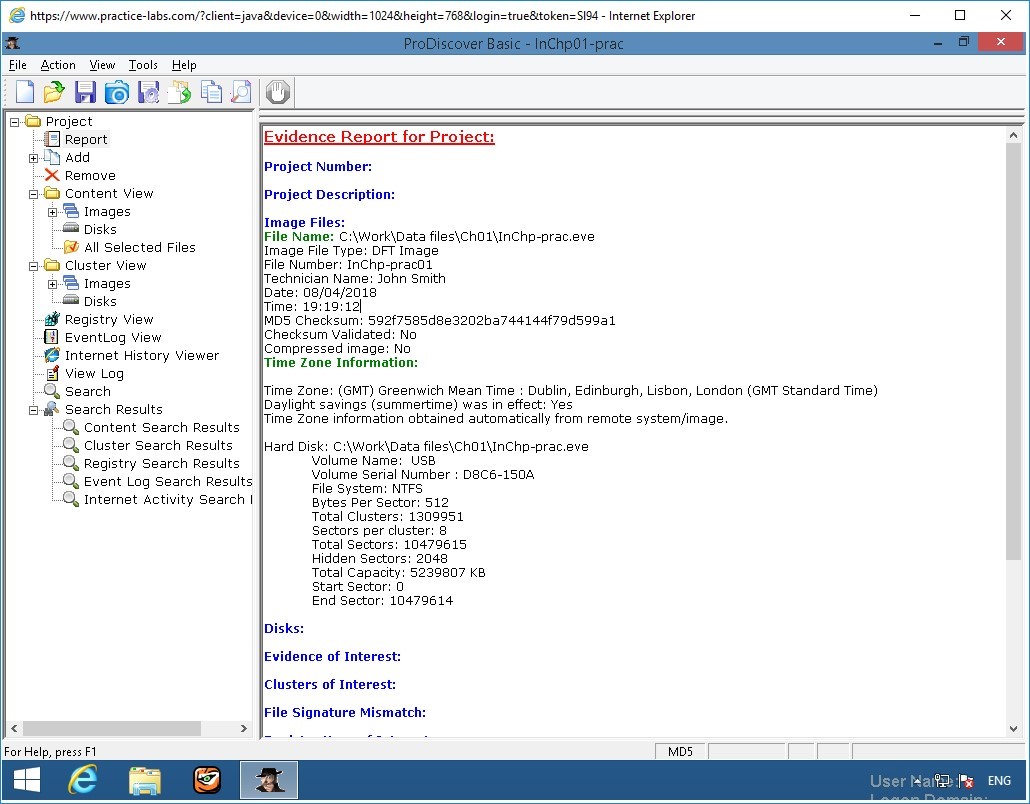
In the tree view, click Report. The report is then displayed in the right pane.
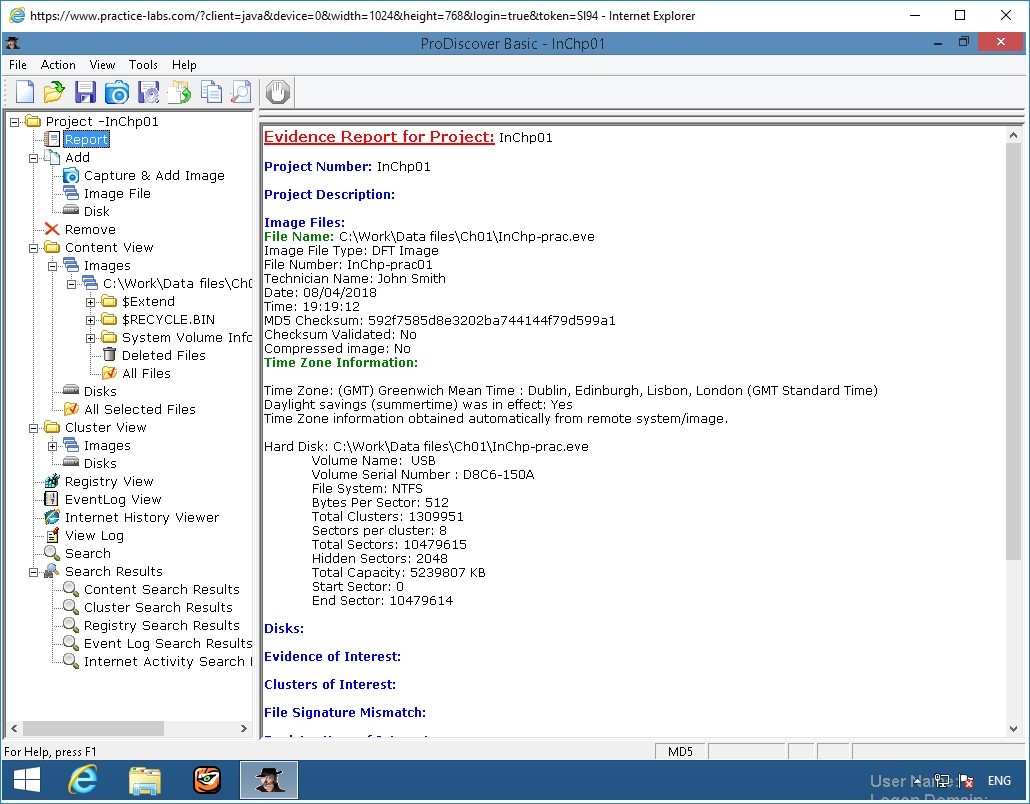
Step 2
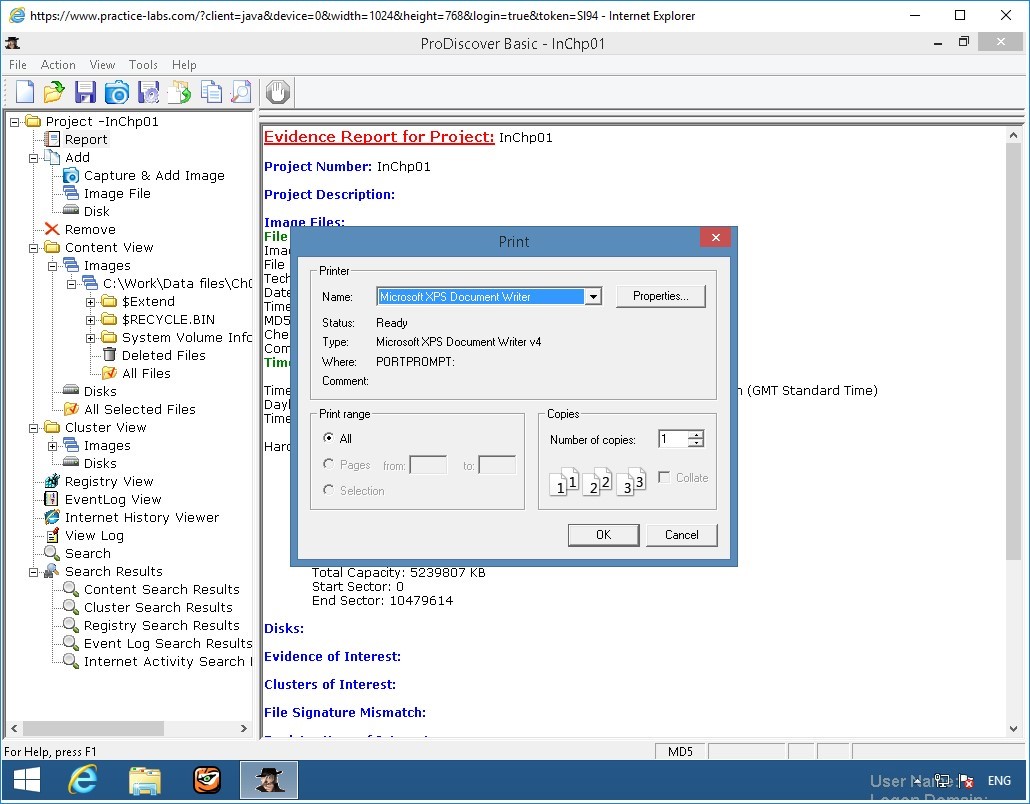
To print the report, click File, Print Report from the menu.
Step 3
Since there are no physical printers installed on the lab devices, you will opt to print the report using Microsoft XPS Document Writer.
In the Print dialog box, click OK.
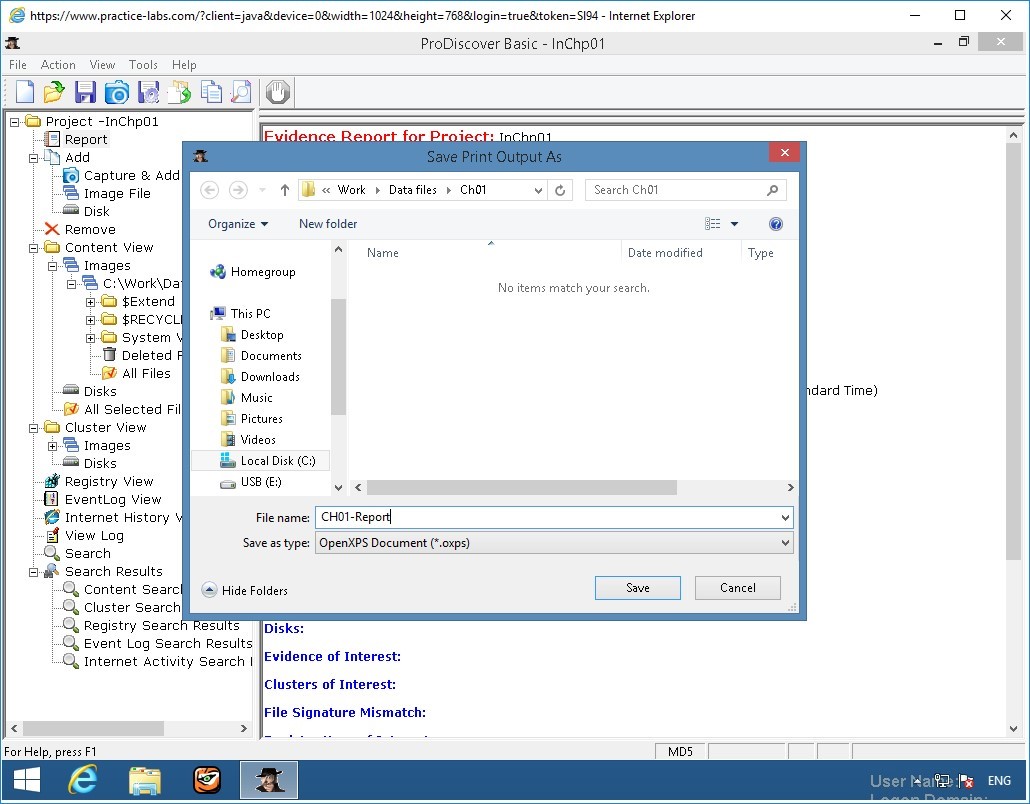
Step 4
On the Save As Print Output As dialog box, click in the File name box and type:
Ch01-Report
Click Save.
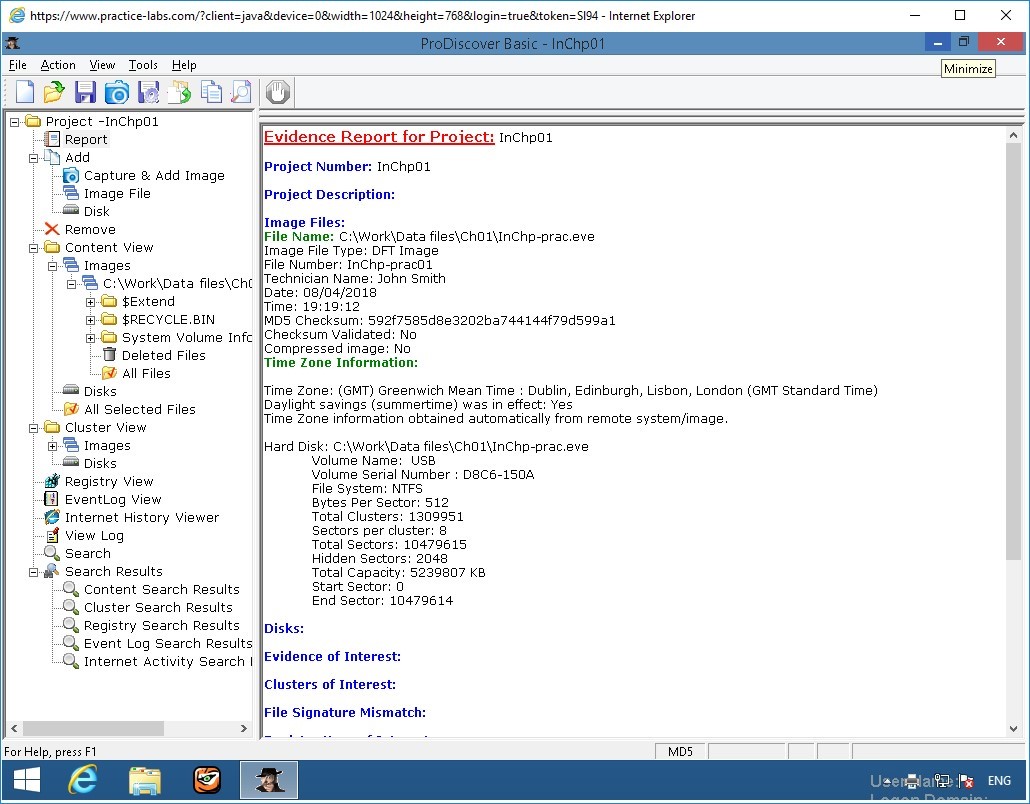
Step 5
Minimize ProDiscover Basic - InCh01-prac window.
Keep the device powered on in their current state and proceed to the next task.
Task 4 - View the Report
To read the generated report from ProDiscover Basic, do the following steps:
Step 1
Connect to the PLABWIN810 device.
When signed on, click File Explorer icon on taskbar.
Step 2
On File Explorer window, expand Local Disk C > Work > Data files then click Ch01 folder.
On the details pane on the right, right-click Ch01-Report and click Open with then click Xps Viewer
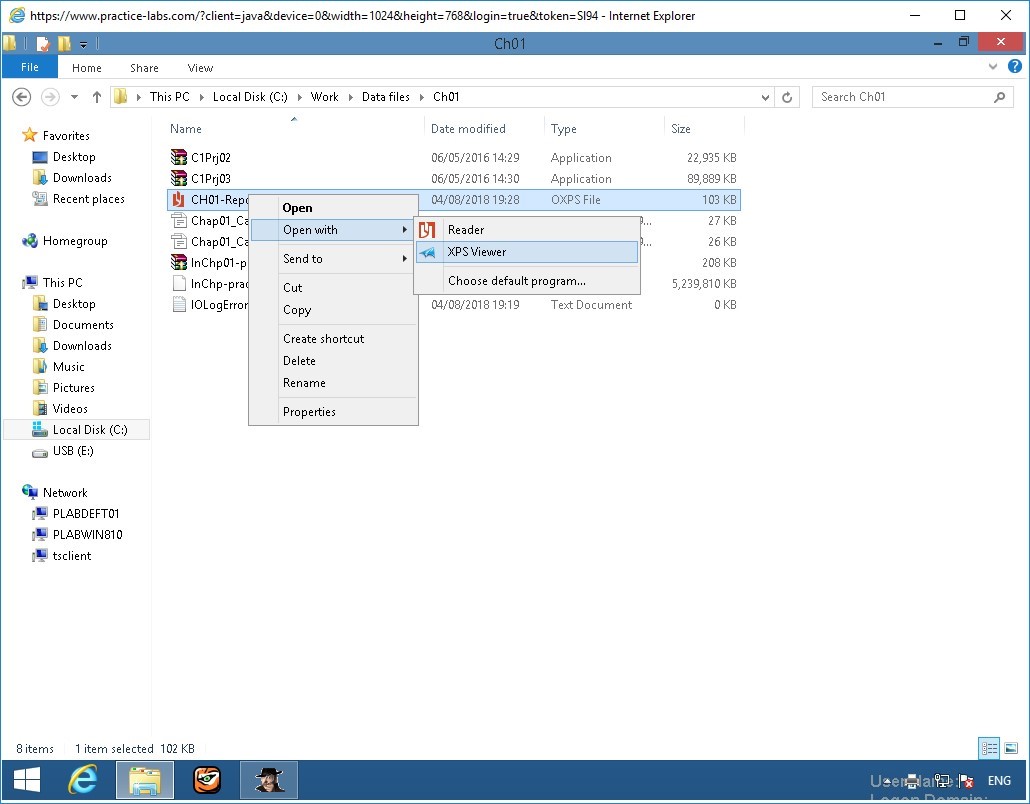
Step 3
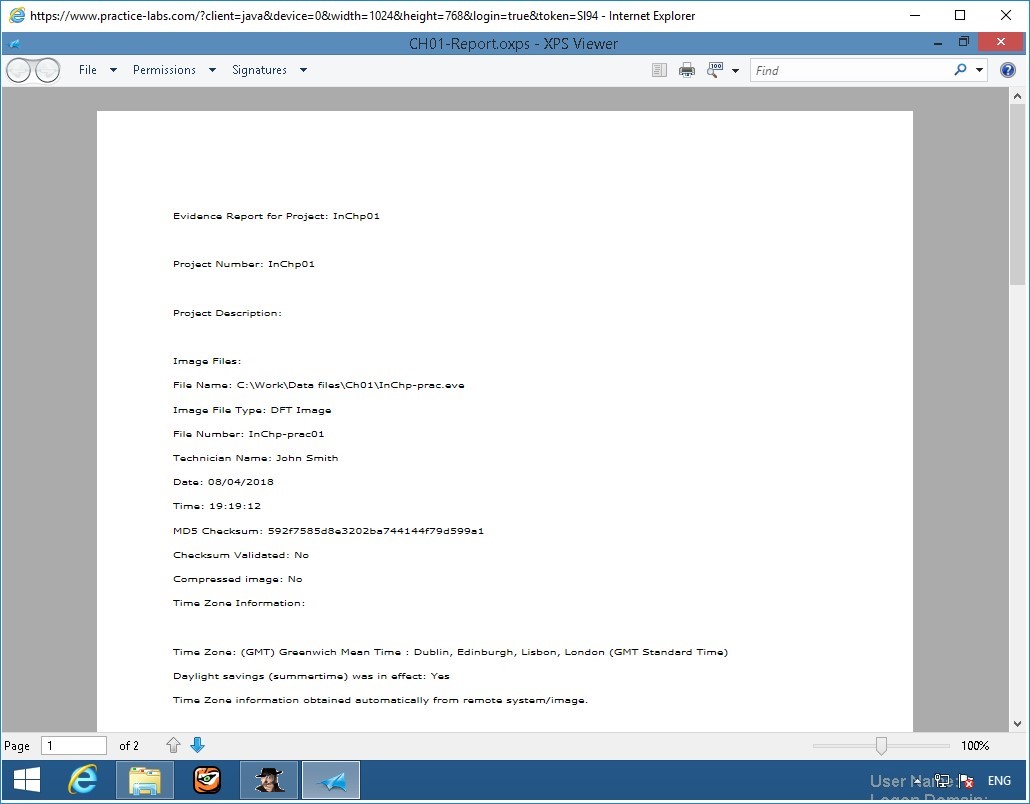
The native XPS reader of Windows 8.1 opens the report.
Hover the mouse on the top of the screen until you see the title bar.
Click [X] button to exit from the app when done going over the contents of the report.
Keep the device powered on in their current state and proceed to the next task.
Task 5 - Export the Report
If the report needs to be saved to a file, you use ProDiscover Basic’s Export feature and choose RTF or plaintext for the file format. To export the report to a file, do the following:
Step 1
On PLABWIN810 device, start ProDiscover Basic 64 as you did in the previous activity.
Step 2
Click File and select Open Project.
Step 3
On the Open dialog box, expand Local Disk (C:) > Work > Data files then click Ch01 folder.
On the lower right portion, locate the drop-down list and select All Files (*.*).
From the list of files, select InChp01-prac file and click Open.
Step 4
When the project is open, you need to add the images once more.
Click File and select Open Image.
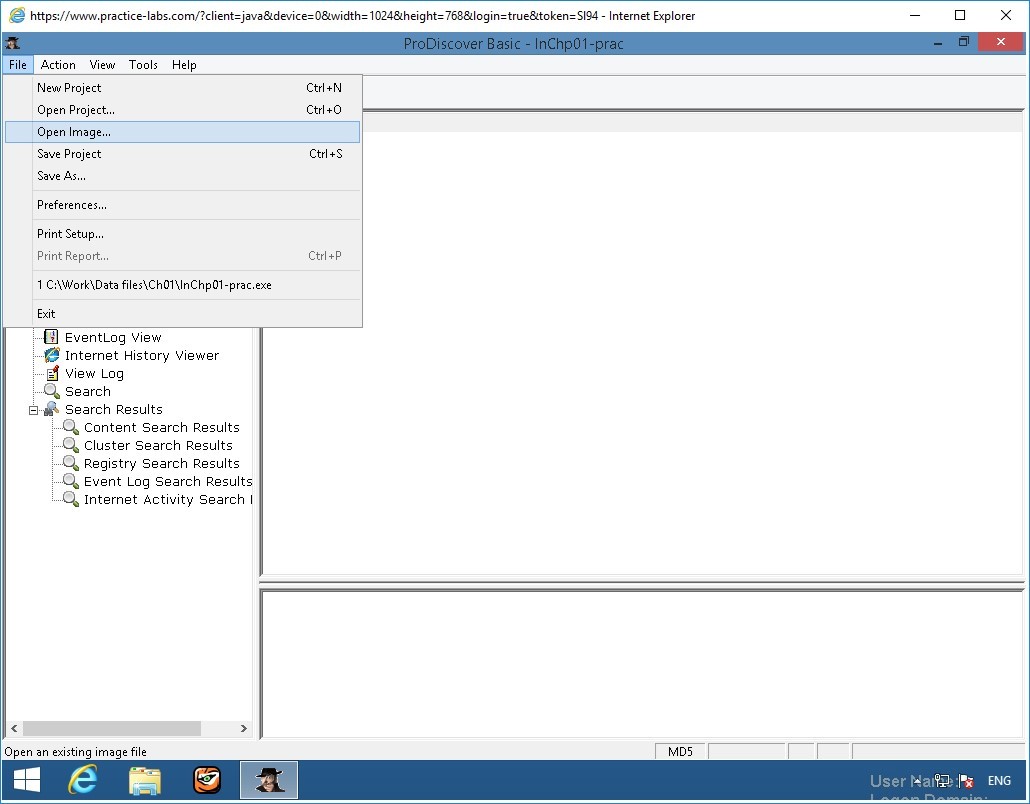
Step 5
On the Open dialog box, verify that you are in this folder path: Local Disk (C:) > Work > Data files > Ch01.
Select InChp-prac.exe and click Open.

Step 6
After opening the image, in the tree view, click Report.
Step 7
Click Action, Export from the menu.
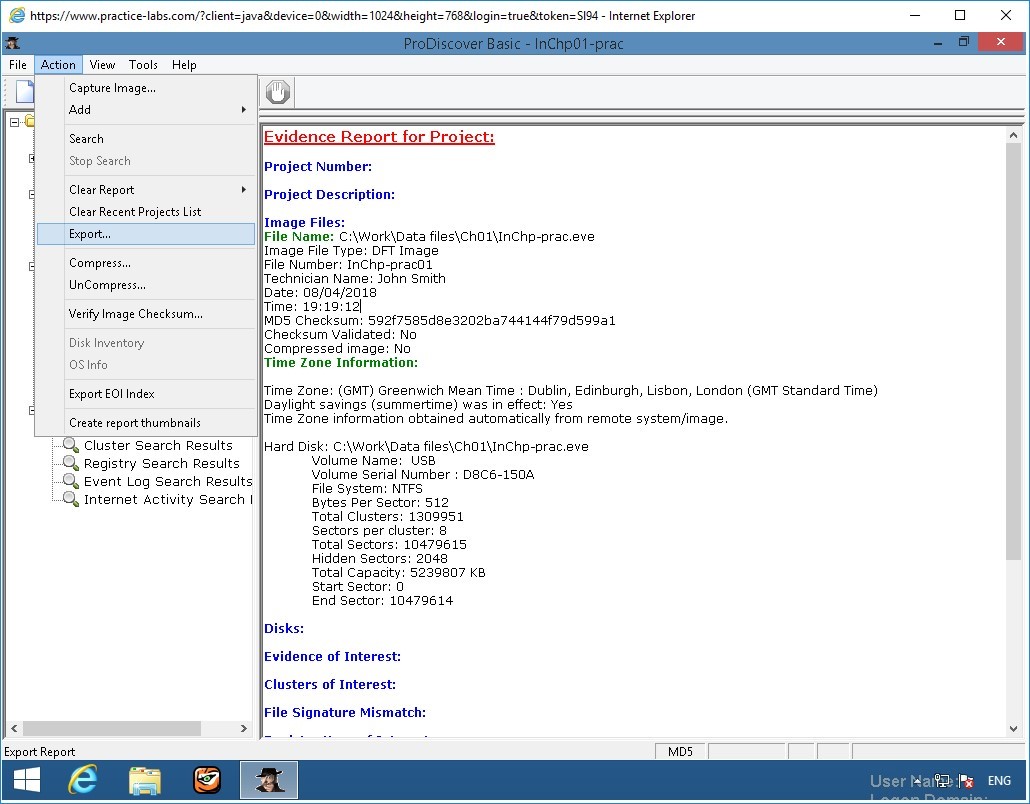
Step 8
In the Export dialog box, click the RTF Format option button, then click Browse.
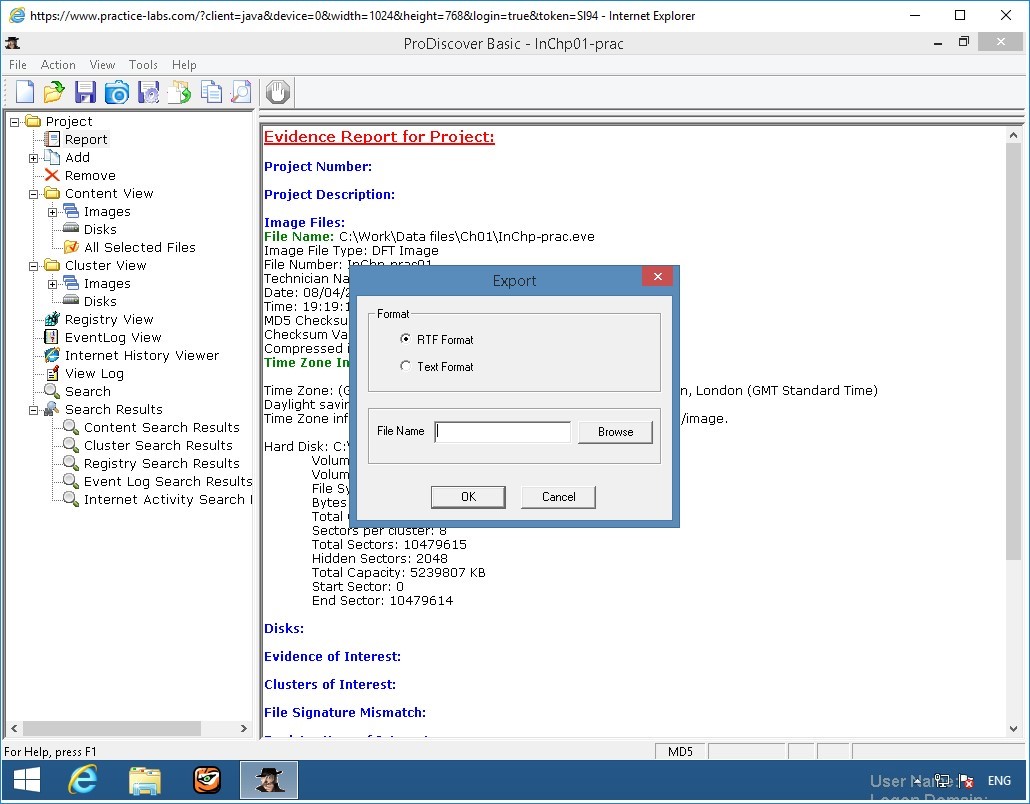
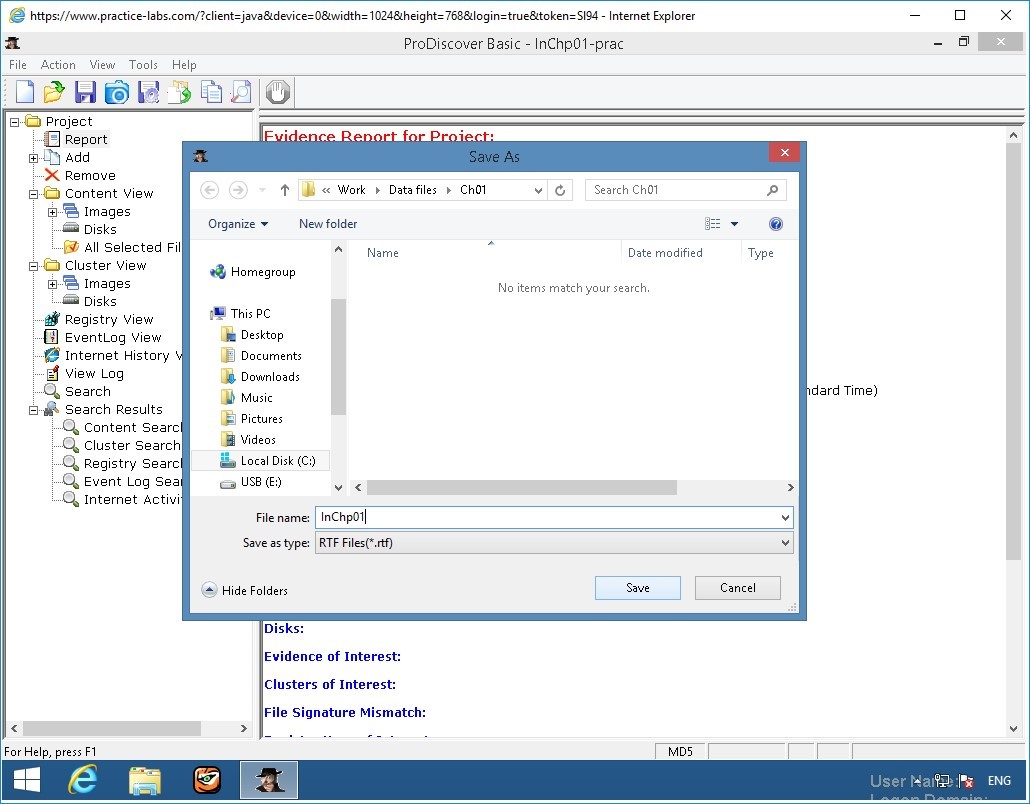
Step 9
On the Save As dialog box, in the File Name text box type:
InChp01
Click Save.
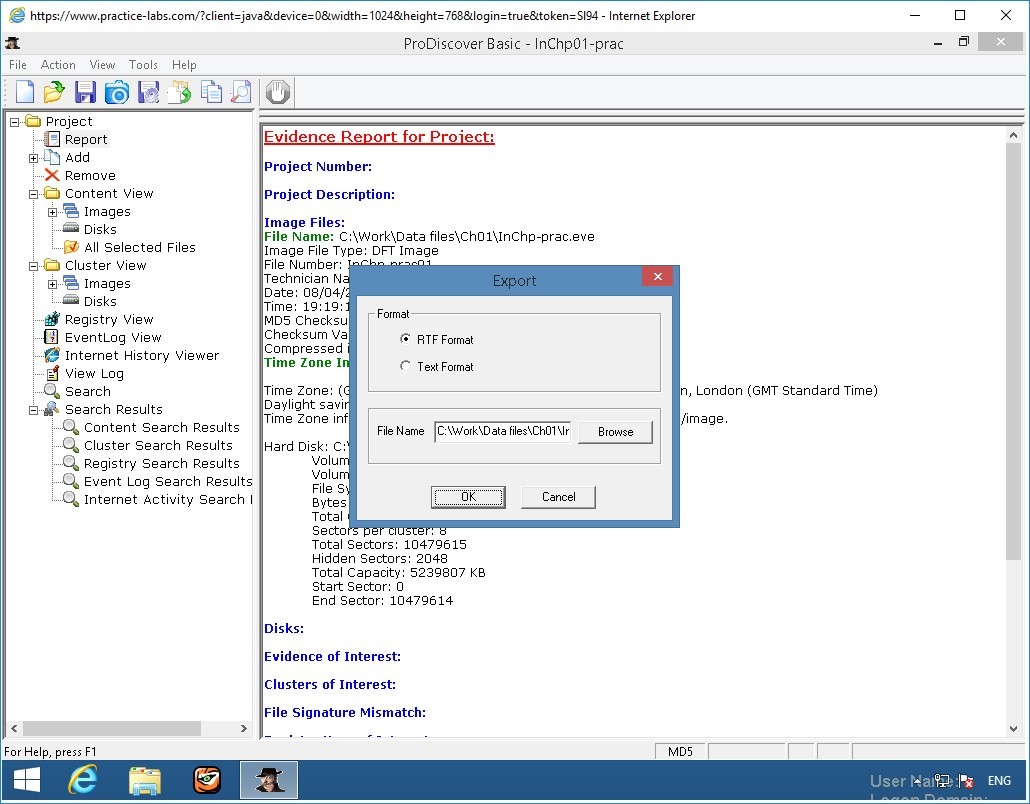
Step 10
Back on the Export dialog box, click OK.
Step 11
Reopen File Explorer to C:\Work\Data Files\Ch01 and locate the InChp01 RTF File you just created.
Open this file by double-clicking.
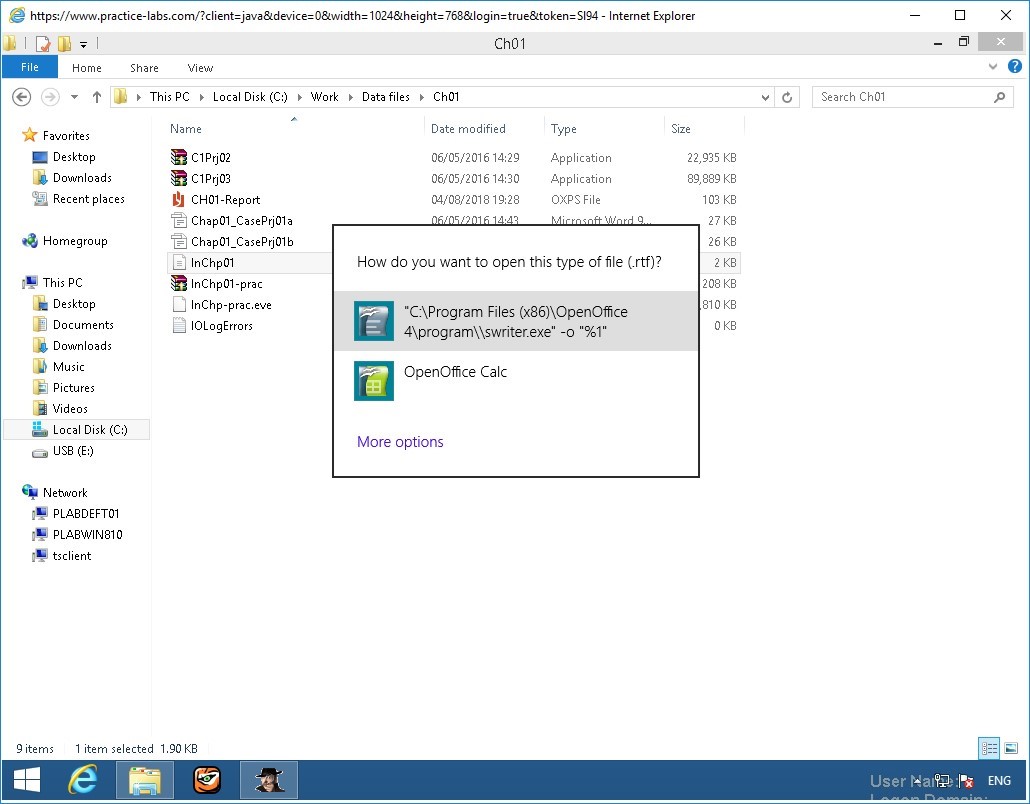
Step 12
On How do you want to open this file dialog box, click “C:\Program Files (x86)\OpenOffice 4\program\\swriter.exe” -o %1.”
Step 13
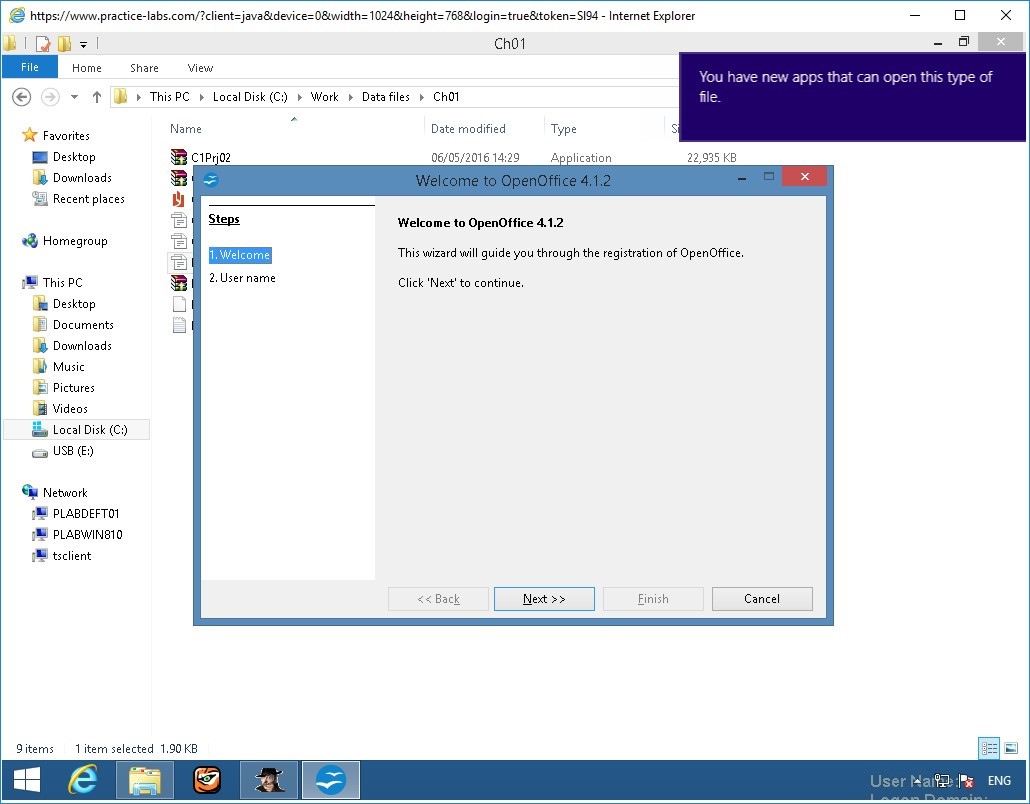
On the Welcome to OpenOffice 4.1.2 dialog box, click Next.
Step 14
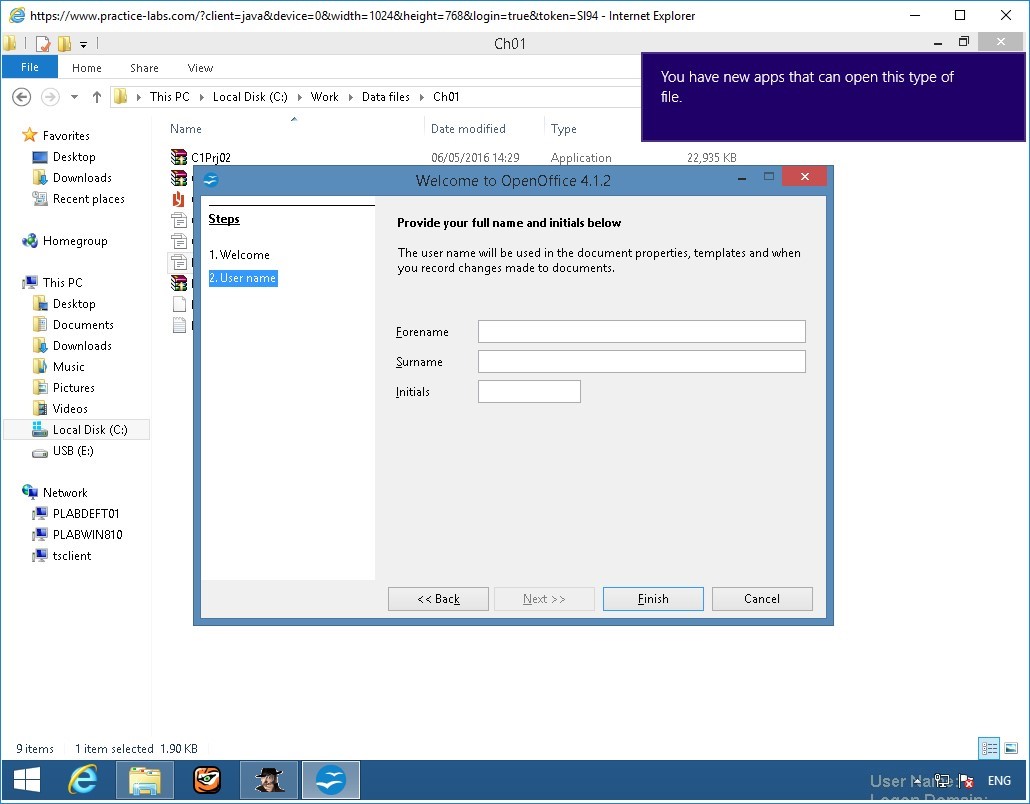
On the Provide your full name and initials below page, keep the fields empty and click Finish.
Step 15
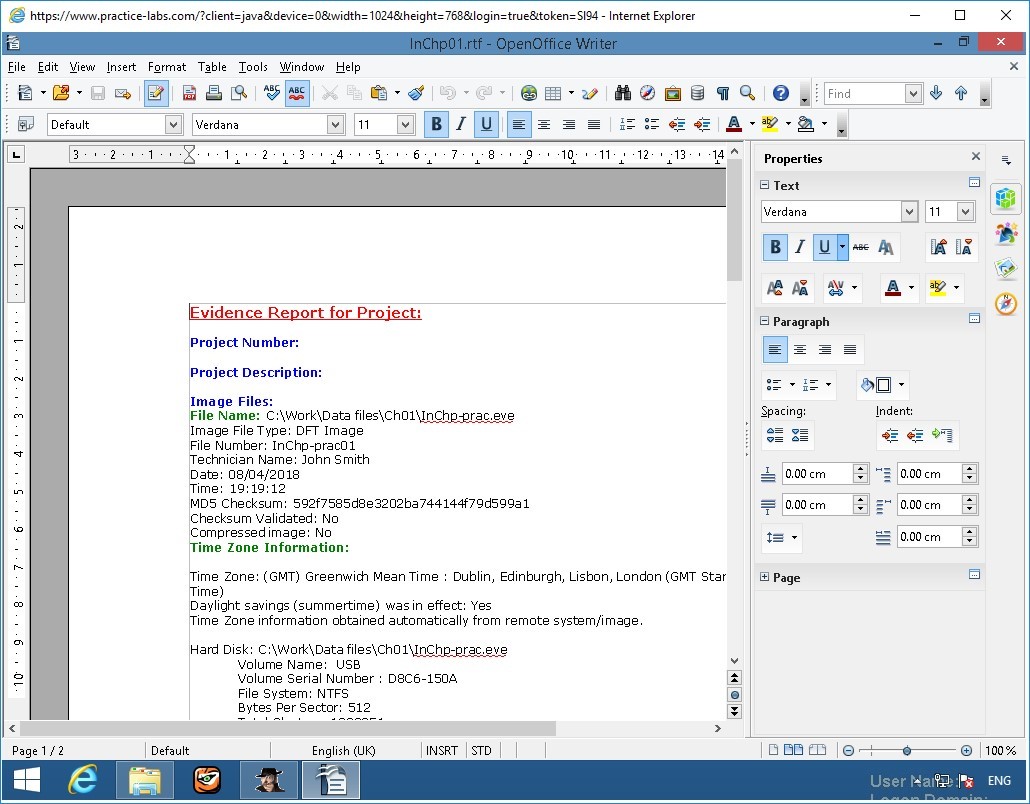
Review the report, close OpenOffice Writer application when done.
Similarly, click File, Exit from the menu to exit ProDiscover Basic.
This activity completes your analysis of the USB drive. In the next section, you learn how to complete the case. In later chapters, you learn how to apply more search and analysis techniques.
CompTIA Security+
Introduction to Digitall forensics exercise 3 - Analysis Example
Performing analysis on the images is used to extract out evidence that an activity has taken place by correlating key piece of information such as times, dates and names to the process or function being performed by the device at the time of question.
In this exercise you will complete the following tasks.
- Image Examination
- Examine Key Words
- Allocated Data
Task 1 - Image Examination
You will continue to work on the PLABWIN810 workstation.
You will be examining a USB drive belonging to an employee who left the company and now works for a competitor. The Law Department is concerned that the former employee might possess sensitive company data and wish to know whether the USB drive contains anything significant.
Further the former employee might have had access to confidential documents because a co-worker saw him accessing his manager’s computer on his last day of work. These confidential documents consist of 24 files with the text “fragment.” They want you to locate any occurrences of these files on the USB drive’s bit-stream image.
To process this case, you will use a file called FATSearchTestImage.eve file on your lab workstation, then follow these steps:
Step 1
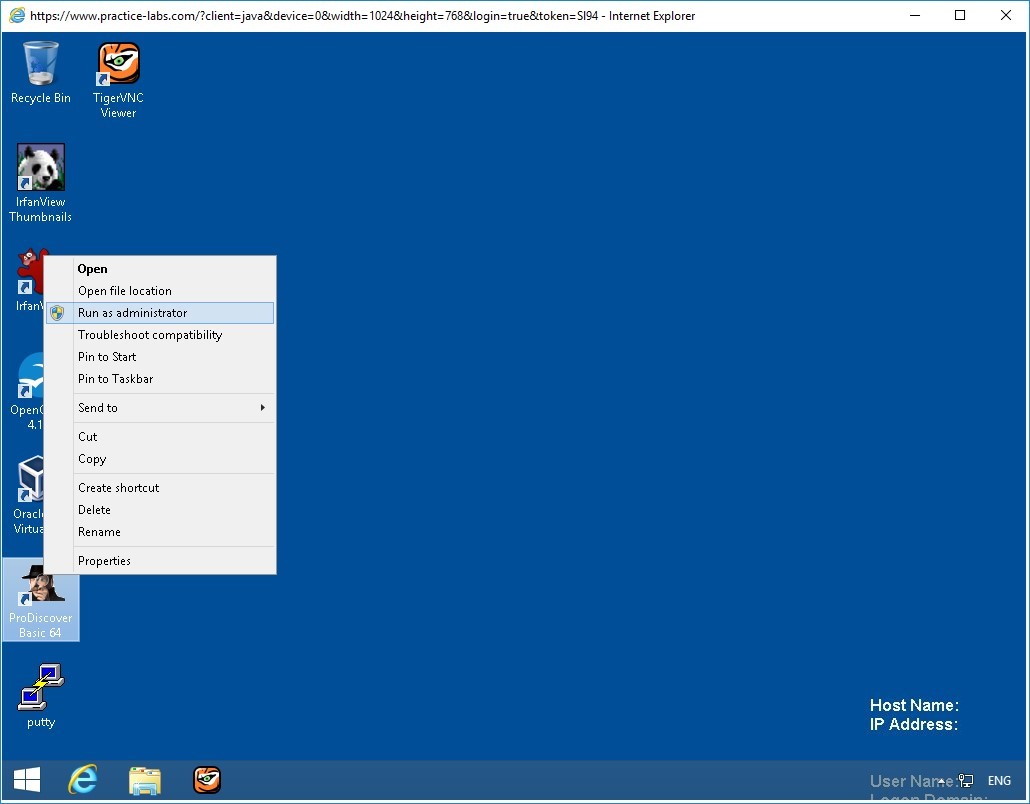
Start ProDiscover Basic with Administrative rights.
To open ProDiscover Basic with Administrative rights, right click the desktop shortcut and select Run as Administrator.In the New Project tab, enter a project number, the project name C1Prj02, and a project description, and then click Open. It’s a good idea to get in the habit of saving the project immediately, so click File, Save Project from the menu, and save the file in your work folder C:\Work\Data files\Ch01\.
Click Action from the menu, point to Add, and click Image File.
Navigate to C:\Program Files (x86)\Technology Pathways\ProDiscover\Sample Images then click and click FATSearchTestImage.eve folder, and then click Open.
If the Auto Image Checksum message box opens, click Yes.
Step 2
In the tree view, click to expand Content View, if necessary.
Click to expand Images, and then click the pathname containing the image file. In the work area, examine the files that are listed.
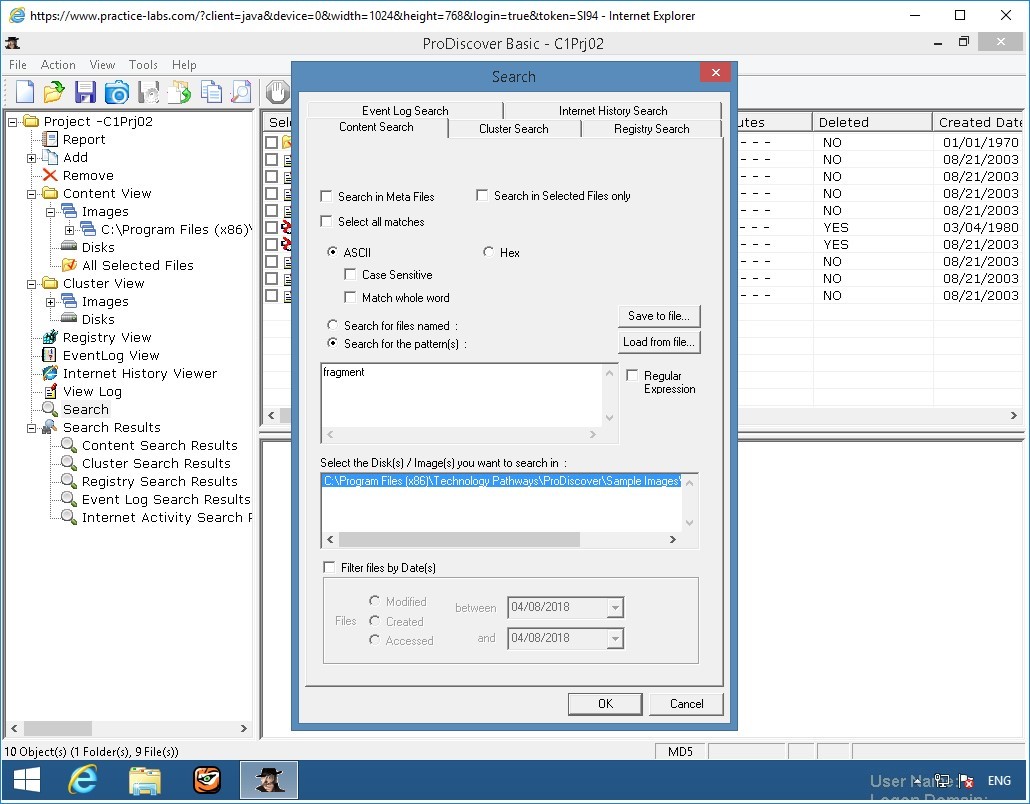
To search for the keyword “fragment,” click the Search toolbar button to open the Search dialog box.
Step 3
If necessary, click the Content Search tab, and then click the ASCII option button and the Search for the pattern(s) option button.
Type fragment in the list box for search keywords.
Under Select the Disk(s)/Image(s) you want to search in, click the drive you’re searching and then click OK.
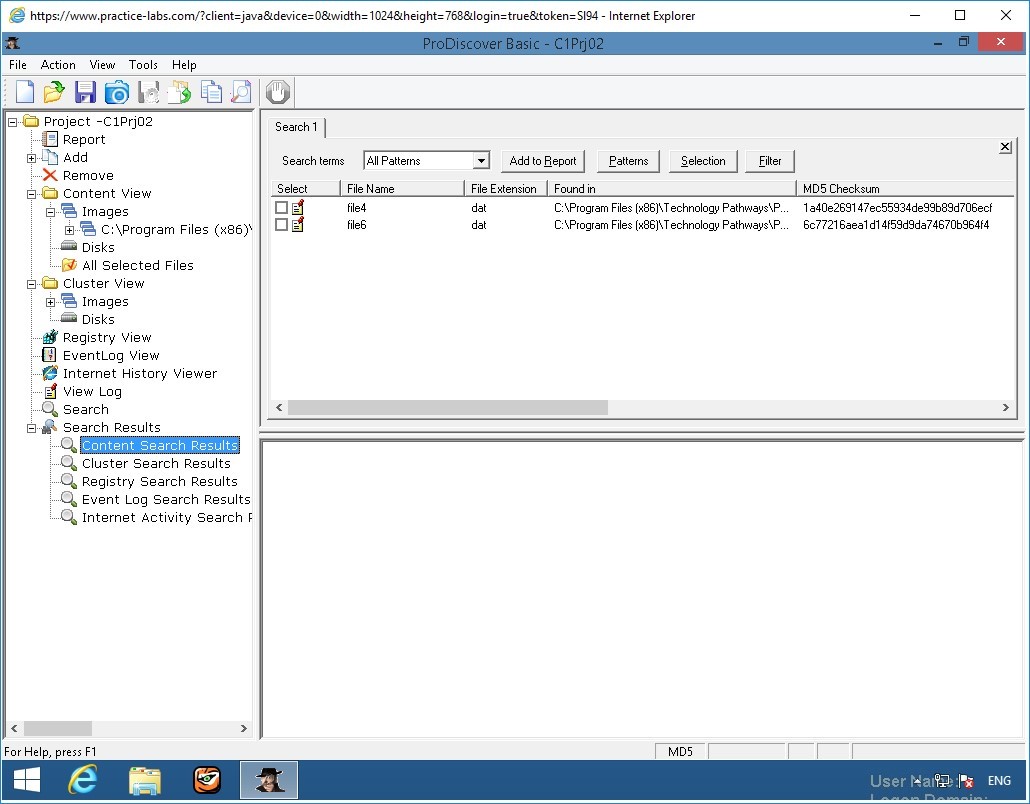
In the tree view, click to expand Search Results, if necessary, and then click Content Search Results to specify the type of search. The screen shot below shows the search results pane.
Step 4
Next, open the Search node to access the Search dialog box again, click the Cluster Search tab, and run the same search. Note that it takes longer because each cluster on the drive is searched.
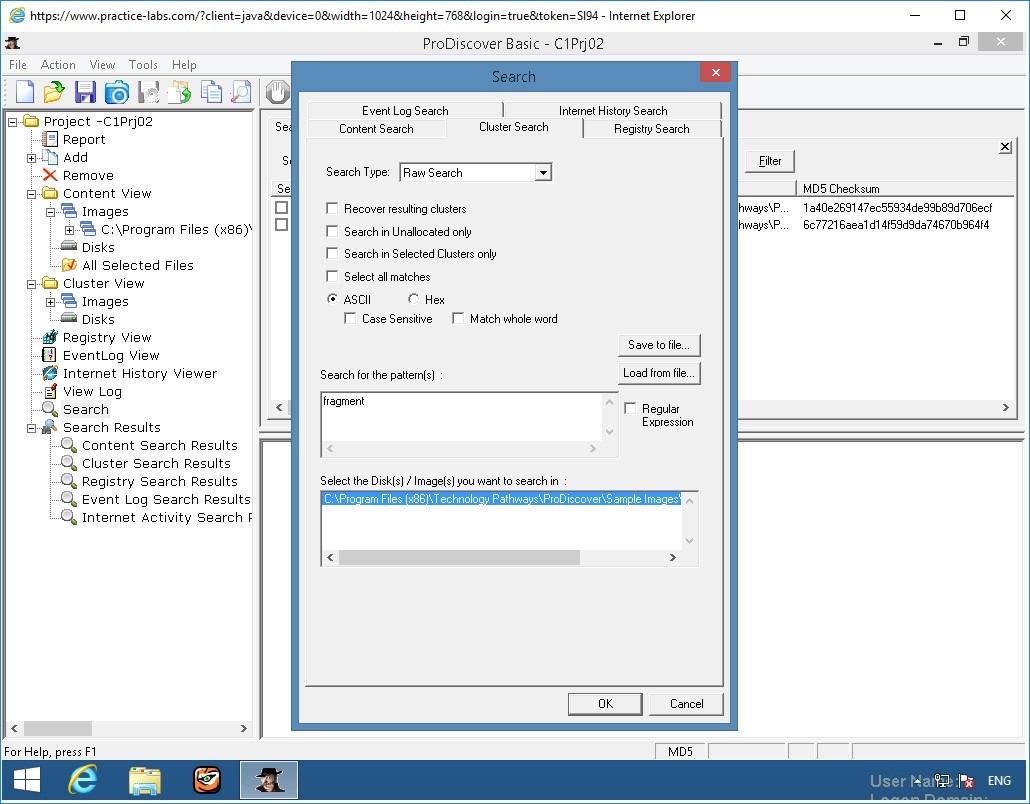
In the tree view, click Cluster Search Results, and view the search results pane. Remember to save your project before starting the next task.
Task 2 - Examine Key Words
You are notified that the former employee has used an additional drive. You are asked to examine this new drive to determine whether it contains an account number the employee might have had access to. The keyword 1cro belongs to the senior vice president and is used to access the company’s banking service over the Internet.
Step 1
In the New Project tab, enter a project number, the project name C1Prj03, and a brief description, and then click Open.
Save the project in your work folder by clicking File, Save Project from the menu.
To add the evidence, click Action from the menu, point to Add, and click Image File.
Navigate to C:\Program Files (x86)\Technology Pathways\ProDiscover\Sample Images and click FATSearchTestImage.eve then click Open.
Click Yes in the Auto Image Checksum message box, if necessary.
Note: To aid in your investigation, you might want to view graphics files on the drive. To do this, click to expand Content View in the tree view, click to expand Images, and then click the pathname containing the image file.Step 2
Click View menu and select Gallery View.
Scroll through the graphics files on the drive image. You’ll need to search through all folders, which can take some time. If a file is of interest, click the check box next to it in the Select column. In the Add Comment dialog box that opens, enter a description and click OK. These notes are added to the ProDiscover report.
Even with this drive you’re still looking for occurrences of the word “fragment.” Open the Search dialog box, and repeat Steps 3-4 of Task 1. When you view the search results, click to select any files of interest (as described in Step 4), which opens the Add Comment dialog box where you can enter notes.
Step 3
Next, search for the keyword 1cro. Click the Search toolbar button. Click the Content Search tab, if necessary, and type 1cro as the search keyword. Click to select the drive you’re searching, and then click OK.
Click the Cluster Search tab, and repeat the search for the keyword. Remember to select any files of interest and enter notes in the Add Comment dialog box.
Remember that text can be found in graphics files as well as in documents. If your search results produces no findings, you might have to search graphics and picture files separately for evidence.When you’re finished, click Report in the tree view. Scroll through the report to make sure all the items you found are listed.
Step 4
Click on Report underneath the Project - C1P3j03 folder heading, then click the Export toolbar button. In the Export dialog box, click the RTF Format option button, type Ch1Prj03Report in the File Name text box, and then click OK. (If you want to store the report in a different folder, click Browse and navigate to the new location.)
Task 3 - Allocated Data
Sometimes discovery demands from law firms require you to recover only allocated data from a disk. Here we will be extracting just the files that haven’t been deleted from an image.
Step 1
In the New Project tab, enter a project number, a brief description, and the project name C1Prj04, and then click Open.
In the tree view, click to expand Add, and then click Disk. Select PhysicalDrive1. Enter a unique name in the provided text below it and click Add.
Click Yes in the Auto Image Checksum message box, if necessary. Save the project in your work folder.
Step 2
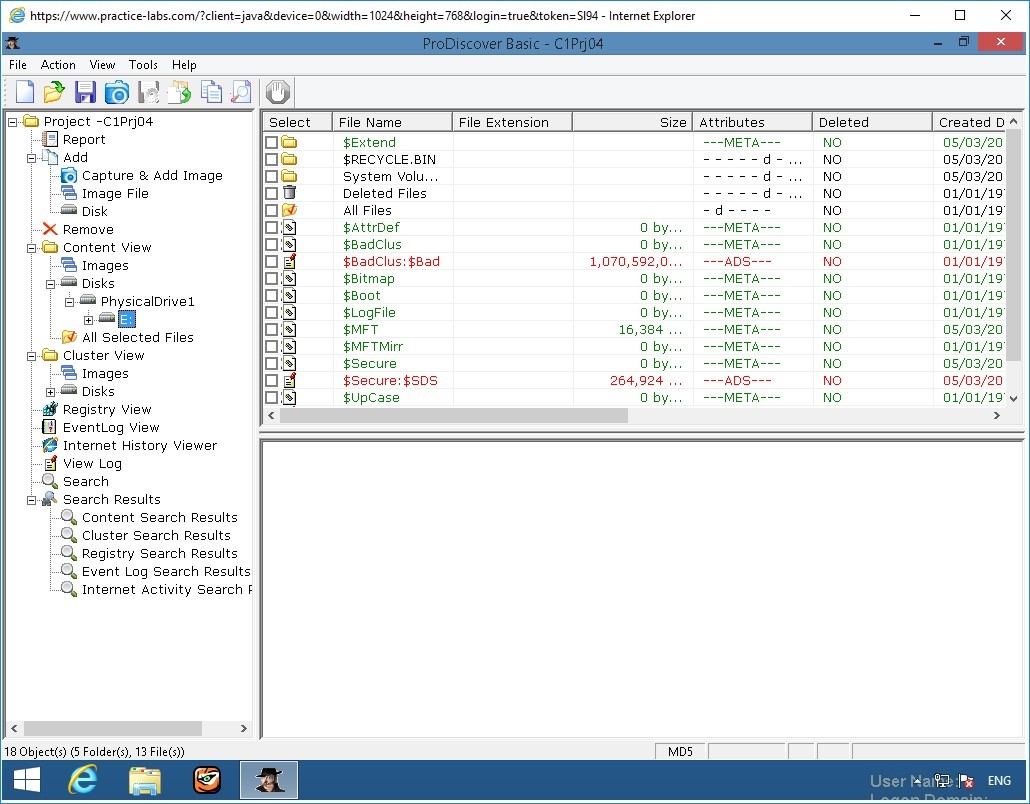
In the tree view, click to expand Content View, if necessary. Click to expand Disks > Physical Drive1 > E. Notice the files displayed in the work area.
Click the column header Deleted to sort the files into YES and NO groups (see screenshot below).
To extract the allocated files from the image to your work folder, right click each file containing NO in the Deleted column and click Copy File.
Note: that in ProDiscover Basic, there’s no way to select multiple files at once. You must copy each allocated file separately.When you’re finished, save the project.
Security+
Introduction to Digital Forensics
Exercise 4 - Report Example
Exercise 4 - Report Example
Reports are key to any investigation and are a very important part of the process with confirming the actions that took place during an investigation.
In this exercise you will complete the following tasks.
- Report listing for unallocated files.
Task 1 - Report listing for unallocated files
This project is a continuation from the previous project; you’ll create a report listing all the unallocated (deleted) files ProDiscover finds.
Step 1
Enter your custom project number.
In the Project File name, type C1Prj04 and click OK.
Click Yes in the Auto Image Checksum message box, if necessary.
Click Action and select Add > Disk…
Select PhysicalDrive1, type a unique name in the text box. Click Add.
Step 2
Expand Content View > Disks > PhysicalDrive1 then click E drive.
If necessary, sort the files in the work area again by clicking the Deleted column header. Click the check box in the Select column next to any allocated file. As you click each check box, the Add Comment dialog box opens, where you can enter a description of each file.

Step 3
In the Investigator comments text box, add a comment noting that the file is on the disk and indicating its file type, such as a Word document or an image file (.jpeg or .gif, for instance). Be sure to enter something meaningful by examining the file first.
When you’re finished, click Report in the tree view. If you’re satisfied, export the report by clicking the Export toolbar button. In the Export dialog box, select the format option you want, type C1Prj05Report in the File Name text box, and then click OK.
Save the project.p0
Introduction to Digital Forensics
Exercise 5 - Keyword Search Example
Exercise 5 - Keyword Search Example
This exercise will rely on previous learnt skills to examine some media from a drive and perform a string search, form a report and save it.
In this exercise you will learn:
- Keyword Examination
Task 1 - Keyword Examination
In this project, another investigator asks you to examine an image and search for all occurrences of the following keywords:
- plabwin810
- shell
Step 1
In the New Project tab, enter a project number, a brief description, and the project name, and then click Open.
In the tree view, click to expand Add, and click Disk.
Select PhysicalDrive1 then type a unique name in the text box the click Open.
Click Yes in the Auto Image Checksum message box, if necessary. Save the project in your work folder.
Step 2
Click the Search toolbar button. In the Search dialog box, type all keywords in the list box (placing each on a separate line), click to select the drive containing the image, and click OK.
Examine the files in the search results pane. Select the ones that look interesting and enter notes in the Add Comment dialog box.
Step 3
Generate a report and export it, as explained in previous projects. Save the project and exit ProDiscover Basic and shutdown the devices.
Shut down all virtual machines used in this exercise using Practice Labs power button function to revert these devices to their default settings. Alternatively, you may sign out to power down all devices.
Comments
Post a Comment